Don't assume you need to completely remove all the plaster, let's see if we can get away with replacing just a little bit...
This post is a supplement to the plastering course and is for repairing plaster, generally patching and filling, but I'll show you how to do it properly. If you’re looking for directions on completely removing whole walls of plaster and redoing the lot, start at my removing plaster how-to.
I reckon you'll get a lot of benefit from this page. If you're in a hurry, you can jump straight to...
- Introduction
- Tools for the Job
- Common Problems and things that need sorting
- Preparation and Planning
- Removing the Bad Plaster
- Preparing the Masonry Before Filling the Hole
- Option 1 - Fill the Hole with Undercoat Plaster
- Option 2 - Fill the Hole with Plasterboard
- Finishing Skim
- Why Does Plaster Fail Around Windows?
INTRODUCTION
This How-to looks useful, tell me more
This post is about those little bits of plastering that make a big difference, where removing all plaster and completely re-plastering is not required, it's more to do with patching up the bad bits, usually something like one of these:
- You knock on the wall and it sounds slightly hollow, not firm, the plaster seems to move slightly when you knock it.
- You've taken the wall paper off and there are cracks everywhere.
- There's one big crack that no paint will cover.
- It's just not flat, whoever plastered it in the first place needs to go to Specsavers and get some new glasses!
- The bits around the window recess are falling off the wall/lintel.
- Finally, and this one's not due to bad plaster - you want to replace that nasty looking plastic trim between the window frame and the plaster.
Well the good news is I have some answers, right here folks. The bad news is you're going to have to sort it once you've given this a read. Going back to the good news - make a cuppa!
What materials do I need?
Depends what you need to do. If I were you, I'd read first, buy after. But I am going to tell you what materials you'll need later on, don't fret!
How long did it take?
Ages, but only because I had two rooms to sort out (for the making of the pictures and video). There was bits and bobs to sort out all over the place. In fact, All the topics in this how-to come from two rooms. So, for both rooms it took me 8 full days of hard graft.
Should I do this myself?
Definitely, it's so easy to sort the little bits of bad plaster out. However, I do cover skim coating over old plaster as one of my solutions (for the really really cracked wall), so this is something you may want to get help for. That said, and because I'm the crash test dummy of DIY, I have covered skimming in one of my previous posts, How to Skim Plasterboard.
Haven't you already covered this topic?
Yeah kind of, but not in a way that would make it clear for readers to know what to do because my previous How-to's are for replacing the plaster on entire walls.
TOOLS FOR THE JOB
What tools will I need?
This all depends what problem you have to solve, But I'll list the whole lot anyway:
- Finishing Trowel – aka a float. I use a 14 inch Tyzack.
- Wide scraper - about 4 inches.
- Thin scraper - about 1 inch or less.
- Bucket Trowel - a must if plastering, general scraping and making sand castles... also good for burger flipping, although you'd want to wash the plaster off it first.
- Painters brush - just for the PVA, so 1.5 inches or more will do and it doesn't matter if it's a rubbish brush - we're going for coverage, not quality here.
- Roller - including the handle, obviously! Like the brush, we're using it to apply a PVA/water solution, so we're going for coverage, not quality, so just get a cheap one for this. Although, a short pile would avoid a lot of mess.
- Bucket - just for holding water.
- Trug - for mixing the plaster in.
- Cloth/sponge - It's plastering folks, it's going to get messy.
- Hawk - For resting you're blob of plaster on to carry it around the room.
Materials
- Sandpaper - 120 & 60 grit sandpaper
- Water
- Thistle Multifinish - to skim over the bad plaster for a smooth finish
- Thistle Bonding Coat - For patches of plaster that have been removed to brick
- Cup of Tea - Without one, I wouldn't even bother starting!
Helpful Tip
You may not need to replace all the plaster, a bit of patching up here and there is perfectly fine, if done properly
COMMON PROBLEMS AND THINGS THAT NEED SORTING
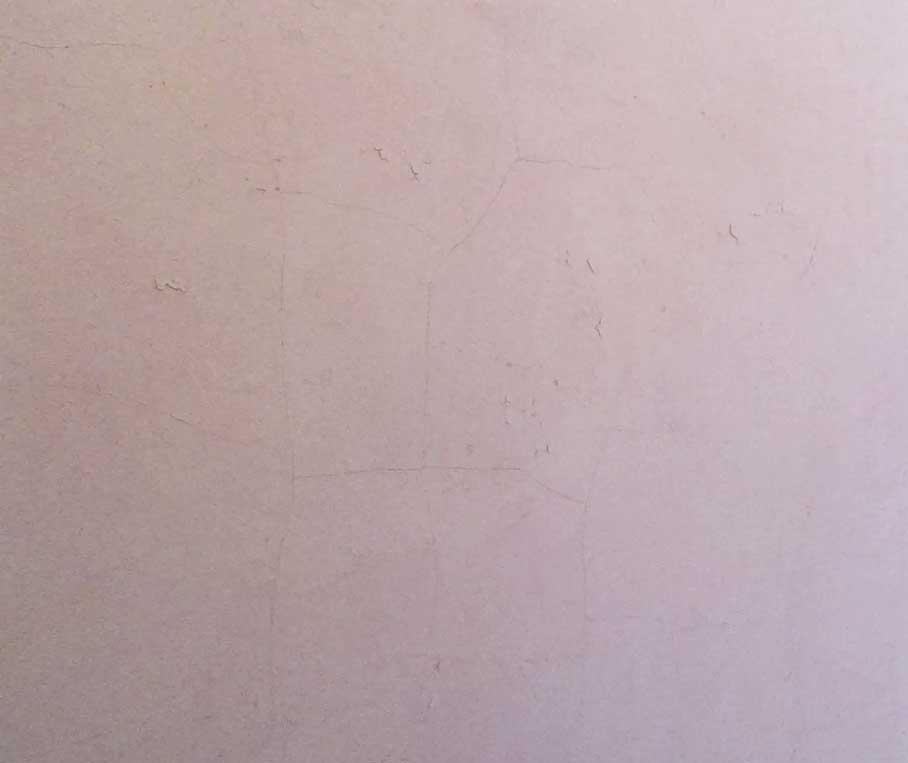
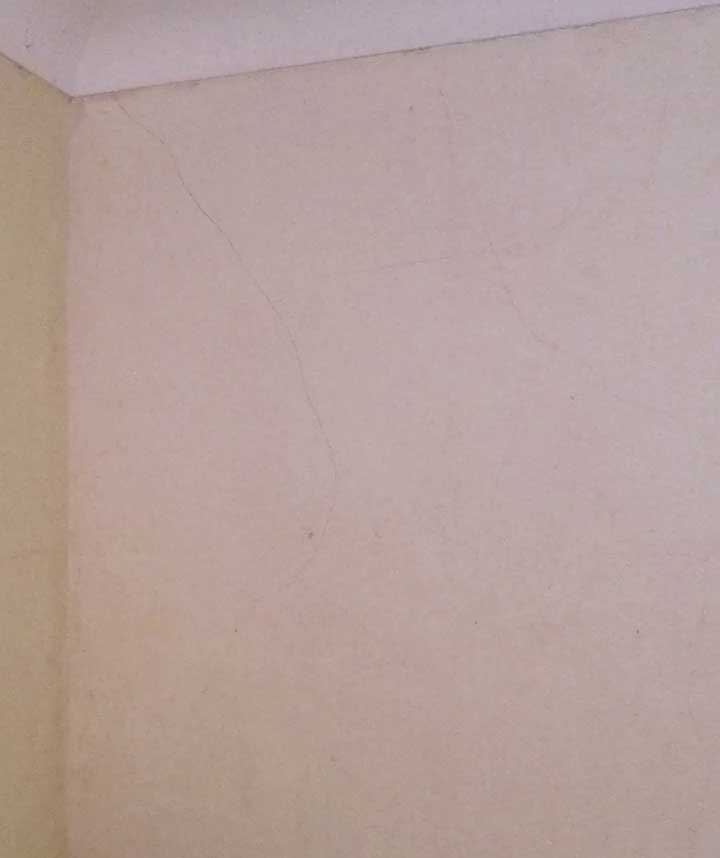
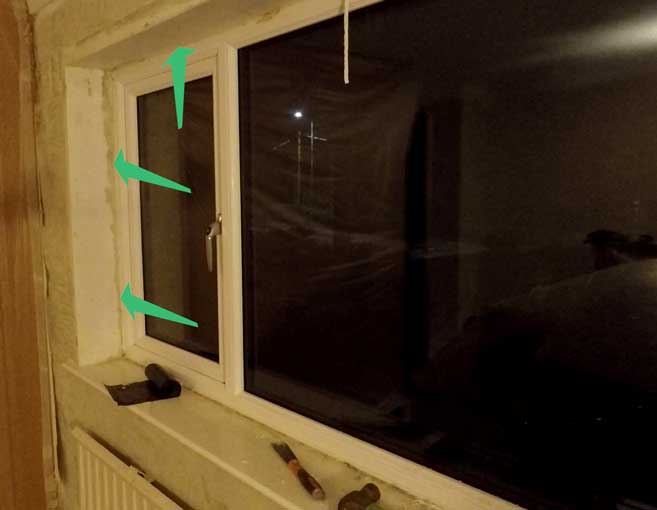
These pictures may look familiar to you, here's what types of plaster repair job I'll be covering in this how to:
PREPARATION AND PLANNING
There are a few things you need to think about before getting started, very briefly these are:
- Strip the wall paper off - I won't cover how to strip wallpaper because it's so basic. But yes, I am assuming you have stripped the wall paper off the wall first - you need to see the cracks to be able to diagnose the extent of problem.
- Have a good look at the cracked plaster, try to determine how widespread the loose plaster is. When I say loose, I mean that it has detached from the masonry behind or just has too many cracks in it in the first place.
- Tap the plaster - To determine if the plaster has become detached from the masonry behind, give it a tap with your fists. There's a bit on my video, about 3:35 in, where I tap good and bad bits of plaster.
- If there are only a few bits of detached plaster, great, this means you're in the right place, read on. If there are lots of loose bits of plaster and you're unsure whether it's worth patching it up, I would opt for removing the lot from that wall and re-plastering it all, better safe than sorry. To learn how to completely re-plaster a wall, start here.
- Cover stuff in sheets. This all depends what you're doing but at least cover the area locally around you. If you're knocking plaster off the walls, then it will likely get quite dusty, so either cover everything, or move everything out the room. I go into detail on protection from dust in my previous post when I talked about removing plaster from walls. I recommend spending 5 minutes reading that to save you potentially hours of cleaning up.
Helpful Tip
Whilst using a steamer to remove wallpaper, you may hear a cracking sound, sometimes quite loud. This is the plaster and render cracking beneath the wallpaper and is a sign that the render is in poor condition, in my case the render was too sandy and didn't contain enough cement.
REMOVING THE BAD PLASTER
Why is it that the plaster in the corners of windows always fails? Well, I'll tell you about that in a jiffy. For now, let's get it sorted.
So I'm guessing it's loose, echos slightly when you tap it, with a little bit of movement. Then, when you remove the wall paper you see something like this:
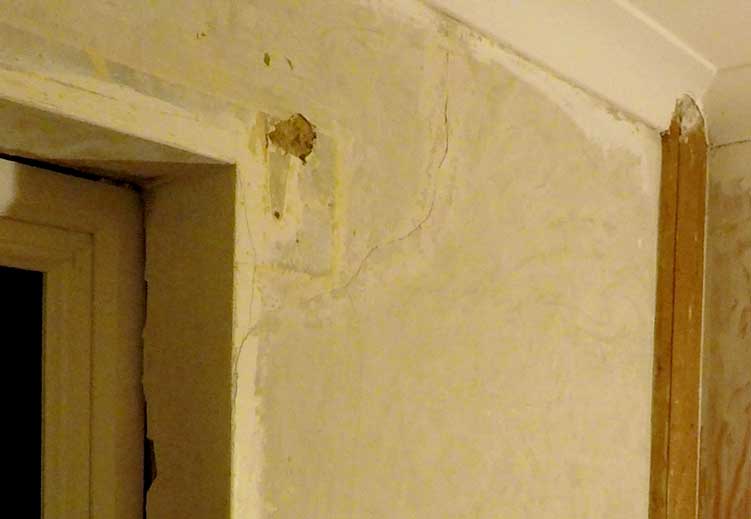
First off, we need to chip out that bad plaster, the loose stuff. Don't knock out the good plaster if you can help it. For this, I find that a 1-1.5 inch scraper works best, something like this:

If you can get yourself a scraper with a metal plate on the end of a handle, like the one above, this'll help as you can tap the end with a hammer and use it like a bolster.
Yes, it's tempting to go for a bolster, that's what most people use for this kind of task. However, I find that a scraper disrupts the surrounding (good) plaster a lot less. This is because its blade is thin, about 1.5mm. Compare this to a chunky bolster, which is 5+mm thick and it's easy to see why a bolster might disrupt the surrounding plaster.
Helpful Tip
Try not to disturb the surrounding plaster. Select methods and tools that keep disruption to a minimum
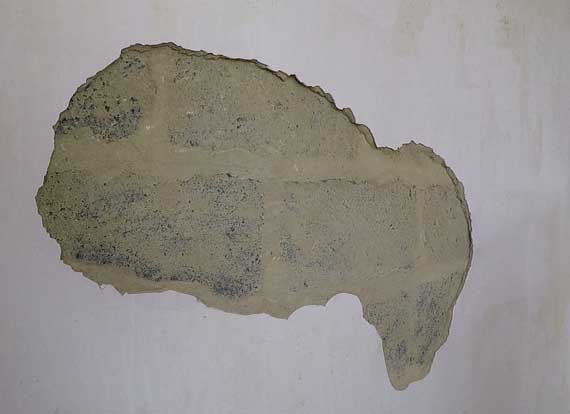
Once the plaster's removed, it'll look something like this:

Do the same with the other problem areas too, so they look like this:
With the large crack problem, just use the corner of the scraper to scratch out a deep groove into the render below.

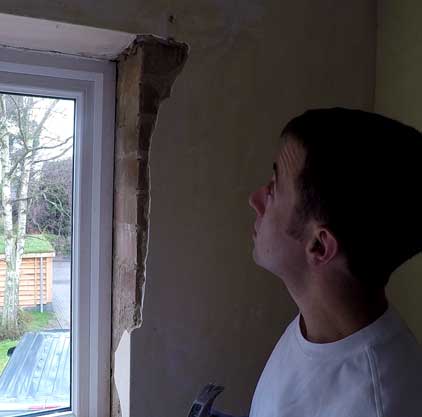
For removing the sealant around a window frame, obviously remove the sealant but you also want to take off a good bit of plaster too, so that the new plaster has a good surface area of masonry to attach to, about half an inch will do.

You'll likely find that the plaster within window recesses is loose anyway, so a scenario like the above picture will probably occur for you too, in that more plaster comes off than you wanted. That's fine, it just means the new plaster has even more masonry to attach to.
PREPARING THE MASONRY BEFORE FILLING THE HOLE
Give the masonry a good clean out with a brush and a vacuum cleaner, Remember to get the edges of the old plaster too, that'll be quite dusty and dust is not our friend.
Once clean, decide how you're going to fill the hole, you have two options:
- Option 1 - Fill the hole with an undercoat plaster, then skim over.
- Option 2 - Fill most of the hole with plasterboard, then the gaps with an undercoat plaster, then skim over
In both cases, you'll need to skim over the undercoat plaster or the plasterboard to achieve a smooth finish, smooth enough to paint onto.
By the time you've read all this post, you should have a clear idea which option to go with, I'm not expecting you to decide right away so don't worry, just read on for now.
As a quick summary, if the hole is quite large, and the existing plaster is deeper than 17mm, then filling the hole with plasterboard makes sense. Plasterboard is 12mm thick and you should add on at least an extra 3mm for the plasterboard adhesive, plus the finishing skim coat is 2mm thick.
For smaller holes, an undercoat plaster makes sense. In my case I used Thistle bonding coat directly onto the masonry. I had to prime the masonry with a PVA & water solution first though, because bonding coat is only suitable for less porous backgrounds.
OPTION 1 - FILL THE HOLE WITH UNDERCOAT PLASTER
So an undercoat plaster is a rough plaster that's designed to provide a backing for a smooth skim plaster, this is called a 2 coat plaster. Thistle's product for the undercoat plaster is called...... Undercoat Plaster, not surprisingly. My local builders merchants didn't have any at the time so I opted for Bonding Coat.

If you have Thistle Undercoat Plaster or a similar product that's designed specifically for the type of background you have, you likely won't need to prime the background first, check the instructions though.
If you're using Bonding Coat on masonry, like me, you'll need to prime the masonry first, because bonding coat is designed for background that are less porous. Mix 1 part PVA with 3 parts water, and brush the mixture onto the bare brick/block and the edges of the good plaster. The PVA acts as a barrier to prevent the new plaster from drying out too quick and also sticks any residue dust to the wall. Without this, the new plaster will crack and will not bond properly to the wall.

Allow to completely dry, then mix up some Thistle bonding coat, just enough for your needs, which can only be applied in 11mm thick coats. If you don't let the PVA dry, it won't act as an effective moisture barrier and the new plaster will crack and become detached from the wall.
When it comes to mixing the Thistle Bonding Coat, you'll need it to be the same consistency as the first mix of skim coating plaster. Here's a link to the exact paragraph that describes in detail how to achieve that consistency, it opens in a new tab by the way. Once you've read that, come back here...
... With Bonding Coat, it contains really large particles. It's no good for a finishing skim, it's just too rough. It does however provide a really good key for a finishing skim coat. Therefore, don't worry too much about getting it smooth, just concentrate on getting the levels right i.e. it shouldn't poke out too far and there shouldn't be a dip.
With mine, I troweled off my bonding coat so that it was flush with the surrounding (good) plaster. This was because I was completely skimming over that wall, so the finished level will be a couple of millimeters above the existing good plaster.

If you're not skimming the wall, you'll want the surface of the undercoat plaster no less than 2mm below the surface of the existing plaster. This will allow enough room for the 2mm thick skim coat to be applied and finished off flush with the existing plaster.
Wait for the bonding coat to set overnight. When you return the next day, use the wide scraper to gently chip off any protruding bits that'll get in the way when skimming.
Now it's time to get skimming. This is a detailed blog post in itself, so I'll give you the link instead. It'll open in a new window, so you can easily hop back here without losing your place.
OPTION 2 - FILL THE HOLE WITH PLASTERBOARD
Okay, so another way of filling a hole between good plaster is to use a piece of plasterboard, this is ideal for larger areas that need filling. You'll still need some sort of filler because the edges of the plasterboard won't meet the edges of the good plaster.

Using plasterboard to fill a hole between plaster can be advantageous to using a base plaster/render (the stuff beneath the thin layer of finishing skim coats), for a number of reasons:
- If you're not confident with plastering large areas, plasterboard will achieve a flat surface with which to skim over.
- Fixing plasterboard to a wall is much less messy than plastering.
- It requires less tools, no need for a trowel or a hawk.
Bear in mind that the plasterboard is 12mm thick, so if you're existing plaster is thinner, then you'll need to fill the hole with an undercoat plaster as per Option 1 above.
As well as using plasterboard to fill a small hole to the corner of my window (as seen in the above picture), I also used plasterboard to one side of a window opening, like so:

Plasterboarding is actually really easy, as long as you take your time and remember to check it is level and in the right place.
I have created a whole blog post on plasterboarding, which takes you through all the steps to achieve the best results. Here's a link, this opens in a new tab by the way, so you can easily come back to this spot when you're done.
Very briefly, whilst I'm on the subject, there is one thing I really want to point out - as per the instructions of the Plasterboard adhesive, there is no need to PVA the masonry before you attach plasterboard, just clean down the masonry. You really do need to make sure it's cleaned down well, otherwise the adhesive will be attaching itself to dust and may separate from the wall in time.
I have seen and heard a lot of people applying a 1 part PVA and 3 part water to the masonry and allowing it to dry before attaching the plasterboard. Whilst this is not mentioned as part of the plasterboard adhesive instructions, it does seem to be an accepted solution.
Once you've attached the plasterboard and allowed the adhesive to dry, say about an hour and a half, you can fill the gaps with bonding coat. I used Thistle Bonding Coat for this and it works a treat.

FINISHING SKIM
For both options, once the bonding coat has dried it's time to apply the finishing skim. This can be applied over the bonding coat, the existing plaster and the plasterboard.
For me, when I was sorting out both bedrooms, I skim the lot, over the old plaster too. This is because I wanted to make sure I had a flat surface throughout and I'd already had a bit of practice at skim coating.
You may be doing the same, or you may just be skimming over little bits, leaving most of your existing plaster exposed. Either way, I have covered how to skim coat in another post. Here's a link to it which will open in a new tab for you.
Once thing to bear in mind - when skimming over existing plaster and bonding coat, apply a 1 part PVA to 3 part water mix and allow it to dry. Then, just before you're about to skim coat, apply another coat of the same PVA and water mix, allow to go tacky, then skim over. From this point the instructions for skimming are the same as skimming over plasterboard.
WHY DOES PLASTER FAIL AROUND WINDOWS?
The reason that plaster mostly fails in the corners and around the recesses of windows is due to two main reasons:
- The forces coming from above the lintel make it move slightly. The wall above the window is pushing down on a lintel (beam), in turn transferring all that weight to the edge of the window, where the lintel (beam) rests on about 6 inches of bricks. Gradually, that lintel wants to sag down in the middle of the window, so it does just a little bit. This (very slightly) turns the end of the lintel (the bit that's resting on the edge of the window), enough to form cracks. It's plaster's own brittleness that makes it unforgiving when it is attached to a surface that moves slightly. A bit like ceilings too, they move all the time, there's always plaster cracks on ceilings. This is due to the ceiling joists expanding.
- It's common for plaster to detach from the walls within window recesses. This is due to the fluctuations in heat that the window receives. If you've stood in front of a window while the sun is shining through it, you can really feel the warmth, there's obviously no wind to cool you down. Then, at night, the heat from within the room tends to escape quickest from the windows, especially if they're open on a summers evening. This fluctuation in heat makes the plaster expand and contract regularly. The masonry below the plaster will be doing the same, albeit at different amounts than the plaster. Not surprisingly, over time the bond between the plaster and masonry becomes detached.
Thanks for taking the time to read through this page, I appreciate it. If you have a comment or would like to get in touch, fill out the email form below and hit subscribe, I look forward to hearing from you.

Thank you for this information and especially the details of the tools needed. Plaster repair is not like patching drywall so it’s vital the right equipment be used. Great info.
Thanks Kieran, great tip there regarding the tools, agree the right one’s are totally vital to ensure a job well done.
well impressed, i scanned the article, i have cracks on skimmed over, old plaster that had no cracks, so was trying to suss out a remedy. you put in much effort & to help others – much appreciated!
Thanks j Hammond, I appreciate the feedback and compliment, happy DIYing!