No need to rush, use adhesive that dries in 90 minutes, so you can take your time and make sure it's done right
Don't think you're in the right place? This is Step 2 in a 6 part course covering re-plastering.
Start at Step 1 - How to Remove Plaster From Brick Walls
Watch the video for the main points, read below to get more...
I'm confident you'll get a lot of benefit from everything on this page. However, if you're in a hurry, you can jump straight to...
INTRODUCTION
Is it difficult to attach plasterboard to a wall?
Fixing plasterboard, or drywall as it’s also known, is remarkably easy to do, and can be carried out with the simplest of tools. The knack for getting those boards plum, to give a straight wall, is easy to achieve and if it all goes wrong, the cost of the materials are very low, so there's nothing to worry about.
That said, there are a number of tools and helpful tips you should be aware of that will make the job:
- easier
- quicker
- avoid causing problems
Why would I want to do it myself?
Fixing plasterboards to a wall is pretty easy. Once you've put up that first board, I'm positive you'll have the confidence to carry on boarding the rest of the room. You'll probably already have all the tools you need already and if you do need to go out and get that 6ft spirit level, not to worry because it's the sort of tool you'll use time and again on other DIY tasks, so you'll get a lot of use from it.
Generally, plasterers are happy to skim coat over plasterboards you've put up, so it makes to take on this task to save paying someone else to do it.
TOOLS FOR THE JOB
What tools will I need?
As a DIYer, I’m not going to insist you go out and buy the professional tools for boarding a wall. Instead, I’ll show you how to do it with tools that most people already have and if not, are quite cheap to buy.
As a minimum, you would need:
-
- 1.8m (6ft) long spirit level. A good one will cost upwards of £50. A set of small, medium and large spirit levels will be a good idea, here's a set on Amazon.
- Bucket trowel or standard gardening trowel
- Bucket, preferably a trug (I’ll explain why a trug is preferable later on)
- 50mm (2”) battons or spacers (used to set the plasterboard onto so that a gap can be created between the board and the floor)
- Stanley knife with lots of blades
- Pencil, to mark the boards
- A roll of duct tape
- Scraper (because there will be the odd lump of old plaster that you’ll need to chip off)
- Plastic sheets and dust sheets
- A small set square (if boarding window reveals)
- A cup of tea (to keep you going)
Materials:
- Plasterboard - usually come as 1.2m x 2.4m and 12mm thick and will set you back around £15/board, allow and extra 10% for wastage/offcuts etc
- Adhesive – comes in a 20kg bag, to be mixed with water. This will set you back £5-£6 and one bag will cover around 10m²
Helpful Tip
The plasterboards are quite large and susceptible to water damage. You'll need a good bit of indoor space to store them, ideally in the room you're about to work in, so plan ahead for this and make some space.
INCREASE AIRTIGHTNESS AND THERMAL EFFICIENCY OF YOUR ROOM
Whilst there is no plaster on the walls, there's a really good opportunity here to improve the thermal efficiency of your room. Airtightness plays an important role in keeping the cold air out and the warm air in(obviously), but is often overlooked when replacing plaster.
By carrying out a few simple steps to fill in any holes and gaps in the walls, you can avoid cold spots on your new plaster and help reduce:
- irregular cold spots
- condensation
- mould
- damp
There are three main ways to do this, all very low cost, low skilled and quick to carry out, as follows...
Fill in the Gaps Around the Windows
When we were choosing which window company to have install our windows, there was one which stuck out from the rest. This was because they promised to add a seal between the window frame and the brick opening, in addition to the usual sealant that's applied around the external gap.

However, once I'd removed the plaster (a year after they installed our windows), I realised that they hadn't done this, instead leaving a void. This wouldn't be too bad because I knew they had applied sealant from the outside, effectively stopping any flow of air. But we all know how sealant can perish, shrink or detach in our bathrooms, let alone on external brickwork, which is exposed to the elements.
To improve on this, I applied expanding foam into this gap, from the inside, before I put up the plasterboards. This stuff is great because it expands into all nooks and crannies, providing a good air-tight seal and stopping the flow of air. If you're doing this though, make sure there is sealant in place around the external face of the bricks/window frame, as you don't want the foam to be exposed to the outside air. Also, this is only advisable if the gaps are no more than 10mm, larger gaps will require a cement and sand mortar filling.
Helpful Tip
Expanding foam is very difficult to remove off most materials, even before it's fully dry. Put masking tape around the window frame before using the foam to avoid a time consuming cleanup operation.
Fill All the Gaps in the Brickwork
I was surprised at how many gaps existed between my bricks.
This is one to do with the plasterboard adhesive. Using a scraper/spatula, simply squeeze adhesive into brickwork cracks to stop the flow of air. Don't use expanding foam for this because it may expand across the cavity and risk touching the outer leaf of brickwork and create something which is known as a "cold bridge" between outer and inner leaf. The term "cold bridge" is pretty self-explanatory, I won't go into detail.
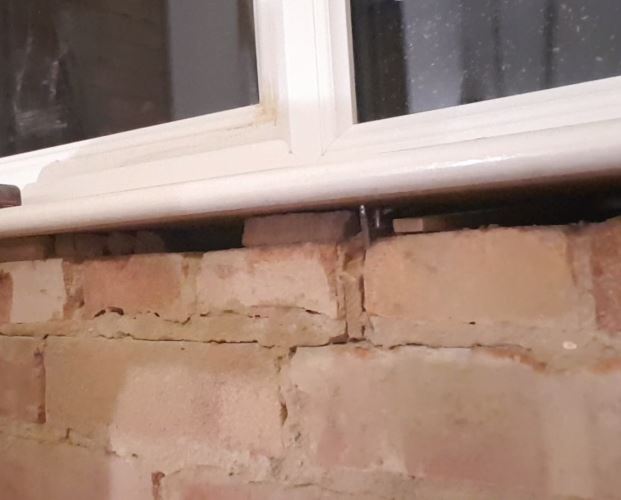
Fill the Gaps below the sills
It's quite common for sills to be resting on a few chocks of wood, with 20mm gaps between.
Expanding foam works best for filling these gaps, providing you're very careful not to spray in too much - it expands a lot! As above, you don't want to create a cold bridge between the inner and outer bricks, so be conservative with the foam.
The reason expanding foam is better suited to this, as opposed to adhesive or some other hard-setting filler, is because it remains slightly flexible. The sill will receive different loads at various stages in its life, from pot plants to children sitting on them, so a hard-setting filler will eventually crack and thus let in air flow.
CHOOSE THE RIGHT PLACE TO START
If you're reading this, chances are you've not had much, if any, experience at putting up plasterboards. When tackling something new, choosing where to start is half the battle. For locating the first board, I recommend two considerations:
- Put the first board up against a corner. That way, you can butt up the edge of the board against the perpendicular wall to ensure it is perfectly vertical
- Choose a clean wall, one without any sockets, cupboards etc in the way, just to make it that little bit easier.
If it is not possible for you to start in a corner, just choose a blank section of wall, free from any obstructions (in my YouTube video, I opted to start in the middle of the wall). As you haven't got a vertical corner to butt the plasterboard up against, mark a vertical line on the wall using a pencil and a long spirit level. Mark another vertical line a boards width (1.2m) from this first line. The first board will be fixed to the wall within these two lines, and you now know where to put your blobs of adhesive (within the lines).

CHECK THE WALL
In most cases, the wall will be fairly even, without any major lumps and bumps. In my Youtube video, I discovered that the bricks on my wall were in and out by up to 15mm. This meant that I had to put extra large blobs of adhesive on the wall to ensure I had a good bond between the plasterboard and some of the recessed bricks.

The best way to check the evenness of the wall is by running your long spirit level against it. Do this with the level vertically and horizontally. If you drag the level across the bricks/blocks, it will hit any protruding bricks or bits of old plaster.
Helpful Tip
If you do encounter bits of old plaster, chip them off right away, otherwise they'll just cause you a headache when you come to put up the plasterboard.
ALLOW FOR GAPS
Plasterboard's come in 2.4m lengths, handy as most rooms are 2.4m high. However, you'll need to allow for some gaps at the top and bottom, so some trimming will be required.
Allow a few millimeters at the top, between the ceiling and the top edge of the board, so that the board doesn't get stuck when you're laying it on the wall.
For the bottom, you don't want the board to go near the floor, otherwise the moisture from your floor slab will rise up the plasterboard and you'll get damp problems. You'll need to rest the board onto a firm and stable spacer, something that's not going to move when you're wrestling with a cumbersome board. I recommend buying yourself some 50mm x 50mm (2" x 2") wooden battens, which work really well and won't budge when putting the plasterboard up.
Put your batten in its position, and measure between the batten and the ceiling. Take off a few millimeters (for the top gap) to give the total length and cut the board using a sharp knife.
Helpful Tip
Grab yourself some wooden stakes from your local builders merchants. Typically 1-2ft long, they are perfectly suited as bottom spacers
CUTTING PLASTERBOARD
Cutting plasterboard is really easy, all you need is a good Stanley knife and plenty of new blades. Following the pencil line, score the plasterboard with the blade, gently at first to ensure you score along the line. Do this along the grey side of the board, not the brown side.
After the first couple of scores, apply more pressure until you have made a 1-2mm groove. Then, using your hands, bend the board outwards so that it snaps along the groove, it'll make a very satisfying pop sound.


You'll be left with the boards still attached by the brown paper on the rear. Use your knife once more to slice neatly through this paper until the boards are completely separated.
Helpful Tip
Check the board to make sure it fits. Once the cuts are made, lay it on top of the batten, against the wall. It's important to do this before putting the adhesive onto the wall, just as a check. This is particularly important if you have had to make intricate cuts for, say, plug sockets. It'll also act as a final check for lumps and bumps on the wall, so press it up against the wall and see if it pivots on anything underneath.
MARKING OUT AND CUTTING FOR A PLUG SOCKET
This is quite a tricky task if it's the first time for you. However, there are some simple steps to take to make things easier for you. This exercise doesn't just apply for sockets, but any wall furniture such as light switches, protruding window sills etc. To keep things simple, I'll use a socket as an example.
So, we have a bare brick or block wall, it has a socket already in place and you want to attach a sheet of plasterboard to it. You've already marked out the vertical lines on the wall, so you know exactly where the board is going in relation to the socket. Put a batten (as described above) on the floor, this will set the exact level for the bottom of the board as you'll be resting the board on that batten. Next, lean the plasterboard up against the wall, to the side of the vertical line.

Helpful Tip
Even though you're sure your measurements are spot on, taking a step back and being able to visually compare the socket vs. the marking out helps to spot any errors.
In my video, I was installing a new back box, this may or may not be the case for you. However, use the backbox as a guide for marking out and allow an extra 1mm on the height and width to give you a little breathing room, the back box will still hold its position quite well.
Once marked out, use a sharp knife to score the rectangle a few millimeters, then punch it out, being careful not to take off the brown paper on the reverse of the plasterboard. Tidy up and square off any edges with the knife. Check the position is correct by dry-laying the board up on the wall, in front of the socket.
There is one more thing you need to remember before putting that adhesive on the bricks. That socket is probably live and has the front plate on it, which will get in the way when putting up the board because the front plate is bigger than the rectangular hole you've just made. Before putting up the board, turn off the sockets on your distribution board (also known as panelboard, breaker panel, or electric panel) so that there's no electrical supply to that socket. Remove the front plate and tidy up the wires into the back box so they won't get caught between the board and the wall. Note: If you're unsure with working with live electrical components, please don't attempt this, find someone competent.
CUTTING FOR CABLE TRUNKING
Before I'd started putting up my plasterboard, I had it in my mind that I wanted the room to be as big as possible. Therefore, I decided that I would cut channels in the boards for the cable trunking, instead of having them sail over the trunking. This allowed the boards to be about 5mm closer to the wall, great news I thought. Here's the problem: it took a very long time to mark, and then cut, the trunking positions and in all honesty, I reckon it's not worth it.
Furthermore, I had to fill those channels with plaster to make the surface flush with the adjacent plasterboards, resulting in more time wasted on gaining about 5mm. What a faff! I learned a valuable life lesson lesson here - don't spend time on things that don't really matter. Much like daytime television, the extra 5mm was utterly pointless.
That said, everyone's priorities are different, so I'll cover the process anyway.... If only for those of you who think that daytime television is a good use of time (sorry David Dickinson, you're not all bad mate).

So, taking the method of marking out and cutting from the previous bit on plug sockets, do the same for the trunking. Make it easy on yourself and cut wider channels than the cable trunking itself, no need to get it bob on.
Stick the separate pieces together as you would normally (I'll cover sticking them to the wall later on).
To fill in the gaps over the trunking, you'll need to take a few extra steps before skim coating the boards. When it comes to skim coating, you want to make things as easy as possible, because time is of the essence. Therefore, those trunking gaps in the boards need to be filled beforehand. This is easy, I did it with Thistle Multifinish.
Before you go and slap the stuff in though, you'll need to coat the edges of the plasterboards with 5 part water and 1 part PVA. If you don't do this, the plasterboards will suck the moisture out the plaster and it will produce a load of cracks and generally be no good. Let the PVA go tacky (almost dry), then fill in the joints with plaster. With the PVA almost dry, it gives two benefits:
- It provides a pretty good water tight seal, preventing the plaster from cracking
- It allows the plaster to stick to it, providing a good bond to the edges of the plasterboard.
Use a trowel (or any straight edge to be honest) to scrape the plaster so it's completely flush with the boards.
Then, check it every ten minutes for about 1½ hours and if any cracks do form, brush on some water with a painters brush until the crack smears out.

MIXING THE ADHESIVE
Adhesive is, well, adhesive. What I mean is that it will stick to anything. So, prepare the floor by laying down a sheet, an old bed sheet will do nicely. Get your tools ready, I recommend the following:
- Standard sized bucket. However, I want to give you a helpful tip here, grab yourself a trug instead. In case you don't know, a trug is a flexible, rubbery-like plastic bucket that'll set you back around £4 from most hardware stores. The reason it's so much better than a bucket is in its flexibility, which bends slightly around your tools when you're scraping out the contents. It doesn't sound like much, but it does make life easier.
- A bucket trowel for scooping out the adhesive from the bucket/trug. A good one will set you back around £15. However, a standard gardening hand trowel will do the trick, just remember to wash the adhesive off before the missus next weeds the garden!
- The long spirit level.
In my video, the adhesive I used was Knauf Drywall Plasterboard Adhesive Bonding Compound. It worked a treat! If you really want to know the spec's, just google them up and you'll find them.

Firstly pour the dry adhesive straight from the bag into the bucket. If this is the first time you're laying a plasterboard, just fill about a quarter of a bucket, which should be enough for the first board. Then add lots of water, whilst stirring with the trowel, until the adhesive is completely saturated with water. Leave for two minutes, then stir some more until you're confident all is wet.
Helpful Tip
Don't use a whisk and drill to mix the adhesive and water. This will only aerate the adhesive too much, resulting in a quicker drying time.
APPLYING ADHESIVE TO A WALL
Using your trowel, literally slap lumps of the wet adhesive onto the wall, between those vertical lines you drew. As a minimum, you want to put the blobs at 450mm (1½ foot) increments, vertically and horizontally. This is about every 6th brick vertically, and 2 bricks horizontally. Don't flatten the blobs against the wall, it's not like tiling, just leave the them poking out from the wall so that good contact is made with the plasterboard when you come to lay it on.
If you're worried that you may not have put enough adhesive on, go ahead a slop some more on, it's actually good fun. Extra blobs won't make it more difficult to lay the board on (to a certain degree anyway, there are limits, you're not going for a full bed of adhesive).

Do I Need to Put Extra Adhesive in Certain Places?
Yes, is the short answer. If you're planning to put heavy shelves up, especially the floating kind, it won't hurt to put extra blobs in these areas. Floating shelves can put extra stress on the plasterboards, due to the way they are fixed into position.
Also, if you're putting smaller strips of board up, around an inner window recess for example, put some extra blobs on too.
PUTTING UP THE PLASTERBOARD
One final check that you have the adhesive in the right place, and you're good to go! Grab the plasterboard and firstly, rest it onto the batten, aiming the top edge away from the wall. Then, push the board into place and gently squeeze it onto the adhesive, whilst making sure it lines up with either the corner or, if you're starting in the middle of the wall, lining it up with those vertical pencil lines.
At around 2.4 metres in length, the plasterboard will bend and flex. Now is the time to get it perfectly straight. At this point, you'll be able to walk away and the board won't fall down (keep an eye on it though, I can't guarantee this), so grab your long level. If you hold it against the board vertically, you will see how the board is bowed inwards or outwards. Push the level against the board to remove the bowed bits, concentrating firstly in the middle of the board, then working your way out to both edges.

You don't need to keep on pushing until it's touching the wall, leave a little gap for the adhesive. Remember, this board needs to line up with the next board, and that next section of wall may protrude out slightly more than this one.
The board will also be bowed horizontally, so repeat this process whilst holding the level horizontally too.
Helpful Tip
Holding the long level horizontally against the board, extend it so that it extends about a metre from the side of the board. This will show the gap between the level and the brick wall and you can use this to determine if you have left a gap wide enough for the next board.
Once you're happy with the straightness of the board, double check it lines up with corner or that vertical pencil line. If it has moved slightly, hold the long level against the edge of the board and tap it with a hammer where required until it lines back up with the line/corner.
Don't use a hammer directly on the edge of the board, this will damage the edges.
PLASTERBOARD A WINDOW REVEAL
You'll likely have to board out a window recess, there's a few good pointers here too.
For the boards that are attached to the wall (not within the recess), these want to overlap the corners of the recessed wall, so that they come in front of the recess boards (this is hard to explain in text, see video or picture below).
The top board wants to do the same, plus sit on top of the wall recess boards (again, see video or picture below).

Stick the side recess boards as per my previous instructions. For the top board, you won't be able to get much adhesive without it dripping off. To rectify this, put a little on the underside of the window reveal and a little on the rear face of the board itself, together they'll be enough to keep that board well and truly fixed in place.

Another helpful tip is for ensuring you get a right angle for those window recesses. Press a small set square against the corner of the plasterboard and squeeze the plasterboard into place until a right angle is achieved (see picture below).

For wider window openings, try to use a single piece of board for the ceiling within the recess. When you've applied the adhesive and pressed it in, you see that it will sag down in the middle, despite the adhesive. To keep it in place whilst the adhesive dries, prop up a long level along the boards length. To prop the level up, cut a scrap piece of plasterboard to the right length and use this as a wedge between the window sill and the long level. You may need a couple of wedges to keep it firmly in place. Depending on the adhesive used, you can remove this after an hour or so.
All done, you're now ready to try your luck with boarding the walls.
Good luck, you can do this!
This is step 2 of my 6 part course on re plastering a wall, the next step covers using Scrim Tape on inner corners, and goes into detail on where to put it. The previous step is all about removing the old plaster.
Thanks for taking the time to read through this page, I really appreciate it as it took a long time to put together. If you have a comment or would like to get in touch, fill out the email form below and hit subscribe, I look forward to hearing from you.
Hi, great info, thank you!
Quick question, what do you fill the gap at the bottom of the boards with? Some sort of sealant? Thank you 🙂
Hi Trevor,
Thanks for the feedback. Nothing was used to fill the gaps at the bottom of the boards in my case. I eventually skirted the room after plasterboarding by trimming the bottom of the boards, allowing the skirting to be stuck to the masonry. In all my research I didn’t come across a need to seal the bottom perimeter of the boards.
That said, I’m always learning so let me know if you find anything on this.
Cheers,
Sam
Hello!
Just found your videos and finding them really helpful in planning my first real DIY at home!
Couple of quick questions – do you still need to leave a gap at the bottom when it’s a first floor room?
If you are still leaving a gap, do you need to put something in to give the skirting board something flush to sit against?
Thanks in advance!
Hi Nikki, not so much of a gap is required for 1st floor but I’d still leave a nominal 1/2 inch gap between floor boards and the bottom of the plasterboard, to keep the two surface separate. This will allow for expansion and ensure the floor boards, when being walked on, don’t disturb the plaster
That’s great, thanks for your reply. I’m only going to be doing a section of one wall (hopefully).
Off to Wickes to pick up my chisel!
Found this site very helpful. It covers all aspects encountered when plaster boarding a room. Thank you.