If you make a shelf wall well, it will be the focal point of the room, drawing attention to it.
Watch the video for the main points, read below to get more...
This post covers everything involved with designing, sourcing the materials, building and finishing a very durable and attractive shelf wall, and takes you through the techniques to achieve really good results.
In a hurry? Jump straight to:
- Introduction
- Tools For The Job
- Considerations - Things To Think About First
- What Do Your Shelves Need to Do?
- Checking the Wall is Suitable to Support a Shelf Wall
- Designing a Floating Shelf Wall With Concealed Fixings
- Creating a Materials List and Ordering It All
- Cutting and Installing the Shelves to the Wall
- Filling the gaps in the Shelf Joints
- Sanding the Shelf Down
- Finishing the Shelf off
INTRODUCTION
What's this about then Sam?
It's quite a good one this time, it's a how-to on building a grid of vertical and horizontal shelves, fixing them to a wall and to each other, then finishing them off with a very good quality lacquer. This sort of DIY project is what I love the most, besides building a shed that is!
What wood did you use?
I used Sapele hardwood, a very popular species from tropical Africa. It's very similar to Meranti, in fact this was my first choice but my supplier didn't have any in stock, and I'm glad he didn't because I'm really pleased with the results Sapele has given me.
How did you attach it to the wall?
With concealed shelf fixings, basically a rod that has a screw on the end. The screw goes in the wall, the rod goes in the wood. I used a couple of small brackets too, I'll explain why later on.
How did you finish and protect it?
I used the same stuff as I used to protect my Parquet flooring - Lobor WS 2K Fusion in Matt | Satin, mixed with Loba Hardener A1. I'll go into more detail on these products later on. I tested this mixture on a spare plank, and also tested International Yacht varnish and wax. I chose the Lobor product from the three choices, because it looked the best and is designed to protect wooden floors from heavy foot traffic.
How much did it all cost?
I'm glad you asked, I've put it's cost on my February spending report, here's a direct link.
It came to £500.83 all in.
TOOLS FOR THE JOB
What tools will I need?
Quite a few tools are required for this folks, so I'll break it down for you (all links open in a new tab in Amazon by the way):
- Chop Saw, aka Compound Mitre Saw – An absolute must. For a quality finish, square edges, neat cuts and to make your life so much easier. If you don't own one, hire one. I use a Bosch Professional GCM 12 SD, and would swear by it, but they're pretty expensive. Don’t forget the blade!
- 2nd fix Hand Saw - If you haven’t got access to a chop saw.
- Electric Hammer Drill - drill with a hammer action, for drilling through masonry. I’ve used the Bosch Professional GSB 18 VE-2-LI for years, and I’d recommend it. It comes with a 13mm chuck, great for larger drill bits.
- 13mm drill bit - this was the diameter of my shelf fixing pins. If you get different pins, go for a different diameter to match the pins.
- 16mm flat wood bit - for drilling a larger hole in my plasterboard, I’ll explain why later.
- 10.0mm wood drill bit- to drill out the hole for the fixing pin.
- 8.0mm wood drill bit- to drill out the hole for the fixing pin.
- 6.0mm wood drill bit- to drill out the hole for the fixing pin.
- 4.0mm wood drill bit- to drill out the hole for the fixing pin.
- 3.5mm wood drill bit- to pre-drill for the 5.0mm screws.
- 2.5mm wood drill bit- to pre-drill for the 4.0mm screws and to drill out the hole for the fixing pin.
- Note: you can purchase a set of drill bits, ranging from 1-10mm. I'd Recommend the Bosch Hawera set.
- 7mm masonry drill bit - for drilling into the walls.
- Optional Impact Drill - They make light work when driving screws into wood or masonry, due to the impact that the drill provides. I’ve used a Bosch Professional GDR 18V-LI for years and it’s still going strong. You can buy both the Hammer and Impact drills as a set to save money.
- Tape measure – A good quality one, not one of those tape measures you get from a Christmas cracker. You need to be able to see the millimeter or inch markings clearly
- Sharp pencil
- Stanley knife
- Rubber mallet - to hit the shelves into position
- 3lb lump hammer - if the mallet wasn’t heavy enough.
- Pack of Spacers - ranging from 1mm to 6mm
- Scraper - always need a scraper!
- 1.8, 1.2 & 0.6m long spirit levels - you can buy them as a set if you haven’t got any. I've used a Stabila set for ages and they're pretty good.
- A good set square - I use a Bahco and it’s a very robust and accurate bit of kit.
- Long clamps, I needed at least a 440mm opening for my shelves. I have used these Irwin clamps for years and would recommend them.
- Step ladder - just a small one will do.
- Sieve - a standard kitchen one will do. Used to sieve the saw dust to mix with the wood glue/filler.
- Monkey Grips - to grip the shelf support pins when screwing it into the wall.
Materials
- Concealed Floating Shelf Support Pins/Brackets - To hold the shelf on the wall
- L bracket - I used 5 of these at the top of the shelf to prevent it coming away from the wall.
- Wood screws -
- 5.0 x 90mm - Used to clamp together the horizontal and vertical shelf elements together, I used about 36. Screws must have a tapered shank, more on this later.
- 5.0 x 50mm - Used to clamp the L bracket onto a wall, I used about 5.
- 4.0 x 30mm - Clamps the L bracket onto the wood, I used about 5.
- Rawl plugs - ones for a 7mm diameter hole will do nicely.
- Sandpaper -
- About 1m of P80 sandpaper
- About 1m of P120 sandpaper
- Wood glue
- Scrap bit of wood - for hitting the shelves into position
- Finish - such as lacquer, varnish, wax or paint, however you want to finish it off. I went for:
- Loba Hardener A1 - mixed with:
- Loba WS 2K Fusion - in Matt | Satin
- Filler - used to fill the gaps. You’ll need to save your sawdust and mix it with either:
- Standard clear wood glue, or
- Lecol 7500 filler - which is what I used but it’s not cheap, really good stuff though
CONSIDERATIONS - THINGS TO THINK ABOUT FIRST
Kicking off this how-to post and I'll briefly explain why I chose the location for my shelf wall, how I checked the wall was suitable, and how I planned it out, before we get down to the knitty gritty. This may prove useful for you when deciding on the location and look of yours.
Here’s a front view on my shelf wall, I’ll teach you how to create a scalable sketch of it later on.

WHAT DO YOUR SHELVES NEED TO DO?
So, you don’t want to bang up a shelf wall just for the sake of it, have a think about why you want it. In other words, what’s it going to be used for:
- If you’re an avid reader - a bookshelf
- Or, if you have a home office - you’re files and folders
- Kids bedroom - To store teddies on
Think outside the box a little, it doesn’t have to have a specific purpose, you may want a shelf wall just for the sake of looking pretty, so interior design plays a part here.
For the first two reasons (books or files), it has to function properly for the intended use, not just look good. For the shelves that are intended to store files, the height between shelves should be spaced apart enough to fit ring binders. If it’s for books, well these tend to be more densely packed than ring binders, so it will require more solid fixings into the wall to bear the weight. If you want it to look good too, then a focus on its aesthetics will be a priority.
For my shelves, its primary function is to store files, as the room will eventually be a home office. It’s currently a dining room by the way, but when I build my extension the dining room will become an office as we’ll dine in the extension.
Another consideration is other household members. Your other half may want to store some books, files and folders on the shelf, so allow extra shelves for that.
Once you’ve had a think about these things, you’ll begin to get a clear idea on what it needs to do and how it will look.
CHECKING THE WALL IS SUITABLE TO SUPPORT A SHELF WALL
A shelf wall can end up being pretty heavy, especially if you’re using hardwood. With this in mind, we need to discuss how it will be supported.
Most of the time, a shelf wall is from floor to ceiling, so the load from it will bear directly onto the floor. This simplifies things somewhat as the only wall fixings it requires will be to stop it from toppling over. When you buy a high bookcase from Ikea for example, it’ll come with a very simple L shaped bracket. This screws into the top of the bookshelf at the back, with another screw taken directly into the wall, effectively fixing the top of the bookshelf to the wall. You’ll need to do this too, especially if you have kids who love nothing better than to climb a bookshelf to reach that box of chocolates you’re trying so hard to cunningly hide from them.
If you’re building your shelf wall that doesn’t sit on the floor (i.e. hung from the wall), it’s quite a different matter, as all the load from it will be dependent on the wall and the fixings you use. Mine was built off the wall, above my desk, so I’ll cover this option for you.
The wall I attached mine to is an external brick wall, pretty solid stuff, so I knew it was suitable for my shelves. If your wall is a stud wall, you may need to consider putting in some extra studs to take the weight. This is common if you wish to hang a large TV off a stud wall, so it’s quite normal for a builder to make these alterations for you if you’re unsure.
DESIGNING A FLOATING SHELF WALL WITH CONCEALED FIXINGS
So we got the location, we know the wall is good (or will be once those extra studs are in), we know what the shelf needs to do, it’s time to design the thing.
Design is important, it helps you in all sorts of ways:
- Visualise the shelf to make sure it looks right. In my case I had a few vertical bits, and it was important these were located symmetrically about the window.
- Produce a materials list so that you know the material quantities and timber lengths you need to order
- Check the design with the other half to make sure you have permission to proceed
Even if it’s a quick pencil sketch on a plain piece of paper, I recommend you take some time to design the shelf wall.
Luckily, I have created an article on creating scalable drawings and I used this shelf wall in its example. Here's the link to "How To Make a Scalable Drawing", which opens in a new tab. Work through the examples in that how-to to create your scalable drawings, then drop back to this guide when you're done.
One of the benefits of creating a scalable drawing is the ability to quickly create a materials list, I'll show you how to do this next...
CREATING A MATERIALS LIST AND ORDERING IT ALL
Okay, so you now have a scalable plan, you need to measure the lengths of the shelf planks here and organise them into a list. Here’s my shelf wall with all the measurements:

From this, I can create a cutting list, as follows:
- 32mm thick x 300mm wide section sizes:
- 1No. Length @ 3.655m (top horizontal shelf)
- 2No. Lengths @ 1.967m (right hand horizontal shelves)
- 2No. Lengths @ 0.696m (left hand horizontal shelves)
- 32mm thick x 280mm wide section sizes:
- 3No. Lengths @ 0.37m (vertical wall)
- 3No. Lengths @ 0.30m (vertical wall)
Now, you may have noticed that I have separated the widths out into 300mm and 280mm wide. This is because the vertical members will be recessed in from the horizontal shelves by 20mm, to give this effect:

You don’t have to do this, my wife and I chose to because we think it looks quite nice.
The wood can take up to a week to get delivered, so get this on order first. Take this cutting list to you local timber merchants. I’ve always found the local merchants to be the best value, when compared to some “unnamed” big brand hardware stores. I’d even favour a local timber merchant over an online “cut-to-order” timber merchant. For the cost of the shelf timber alone (approx 8.5m2), here’s my findings:
- “Unnamed” Big brand chain hardware store - £1065, but would have to settle for Oak (a bit softer than Sapele)
- Online “cut-to-order” website, offering deal - £627
- Local timber merchant - £423
These prices were all based on getting it mainly cut to order, and planed-all-round to a smooth finish
Needless to say, I went for my local merchant!
Helpful Tip
When you receive you wood, check it all against your cutting list to make sure it tallies up, they do get it wrong occasionally.
Bear in mind though, that when giving a cutting list to a supplier, you’ll also need to check their tolerances. Some can be +/- 5mm on the thickness and width, something to be weary of. Also, the lengths will more than likely be over compensated. So, if you haven’t got a chop saw and need the supplier to cut the lengths exactly, make this clear to them.
Next up, you’ll need the fixtures and fittings. Remember we’re going for a concealed shelf wall here, so we’re going to use hidden fixings. These things are called floating shelf pins/brackets.

The end with the thread goes into a rawl plug in your wall, the other end goes into the back of your shelf, obviously you’ll need to drill the hole first!
I used quite a few on my shelf, about 14. Here’s how I spaced them out. The pins are shown as a red circle:

There weren’t a huge amount of places to get them but I found B&Q to be reasonable, at £7.47 a pair (at the time of writing), bringing the total to £475.29.
I also needed some screws. The thing with screws is there’s two main types - one’s with tapered shanks and one’s without. Here’s a picture of both, guess which ones which:

The tapered shank screw is the one on the left, and is the type you need. They tend to come as standard for screws that are 90mm long or more. You’ll probably only need one box. Count how many you’ll need. Assume you’ll use three per join, here’s the three plugged screw heads on the underside of one of my joins:

And here’s the location for each join:

So there are 12 joints, each with three screws, totalling 36 screws at 90mm long, with tapered shank. Go for these, they won’t fail you and are a very good price for the quality:

They are the 5.0 x 90mm Super Drive CsK Pozi Recessed type, 100 per box. Here’s the link to purchase them on Amazon (opens in a new tab):
To attach the top of the shelf to the wall, you’ll need an L bracket, one of these:

You’ll see how you can paint over it so that it becomes virtually unnoticeable.
To attach the L bracket to the wall, use a 7mm Rawl plug with a 5.0 x 50mm screw, here’s a link (opens in a new tab):
You’ll only need one screw per bracket, I used 5 brackets, which was probably a bit overkill but I’d prefer to play it safe.
And finally, you’ll need to attach the L bracket to the wood. In my case, the shelf wood was 32mm thick, so I opted for 4.0 x 30mm screws:
We’ll cover the other materials required for finishing the wood off, such as sand paper etc, later on, for now we’ll concentrate on putting it together.
CUTTING AND INSTALLING THE SHELVES TO THE WALL
Where to start?
Right, it’s finally time to get cracking. Start with the top shelf and work your way down.
For my top shelf, I split this into two pieces, both at about 1.8m long, so that the lengths ended up like this:

I did this because I knew it would be too difficult for me to slot in a 3.6m long shelf onto pins in one go. The weight of the 3.6m long shelf alone was 23kg’s. Therefore, by creating a joint over a vertical support shelf, I was able to make my life a little easier.
Helpful Tip
Clean your tools before working on the wood because any dirt or grease on bare wood will likely show up when you treat the surface, especially with varnish or lacquer. Keep your hands clean too.
Making the First Cut
So I knew I’d start with that piece at 1.854m long, to the top left.
Don’t rely on the timber merchant getting their cuts exactly square, use a set square to check their cuts are straight. Sometimes, the ends have not been cut and there’s still a protective coating on it.
I’d cut both ends anyway, as I know it’ll be a straight cut so I may as well.
Check the chop saw is set up correctly, all angles are at 90 degrees, perpendicular to the shelf plank, then make the cuts.
Before fixing the plank to the wall, we first need to mark its position on the wall itself.
Marking the Wall
Mark the Wall so you know where the shelf is going to be.
I started with the top left piece, which was to be 2.07m from floor to the underside of the top shelf. So I marked the wall at 2.07m and, using my long spirit level, I extended a line across the wall by 1.854m, to mark the end of that piece of wood.

Once you’ve marked the position of the shelf piece, you can now mark on the position of the support pins/brackets.
Start off by coming in from the ends of the wood by 100mm, then going up by half the thickness of your wood. For me, my planks were 32mm thick, so I came up by 16mm.
Do this on both ends.
Drilling the holes for the concealed shelf pins/brackets
You’ll need your hammer action drill for this, if you’re fixing into masonry that is. Make sure you keep the drill as horizontal and perpendicular to the wall as possible, a wonky pin can be a pain in the backside!
The shelf pins will likely come with their own set of Rawl plugs, so check the instructions to see what size hole it recommends you make. Then, select a masonry bit 1mm less in diameter and use that first. If the Rawl plug won't slide into that size, step it up by 1mm. This is because the suppliers sometimes over-egg the hole size and the last thing you want is a hole too big!
Helpful Tip
Be sure to drill at least 10mm deeper than the length of the Rawl plug, because masonry dust tends to collect at the end of the drilled out hole and you'll otherwise struggle to get the Rawl plug all the way in.
Once you’ve drilled the hole out, swap the drill bit for a flat drill bit, I used a 16mm one. Yours needs to be a few mm larger than the diameter of the shelf pin (the part that slots into the wood).
The reason for this is because I have 12mm thick plasterboard covering my brick wall, and I need the base of the fixing pin to rest against the wall, not the plasterboard, like this:

See how the 13mm diameter part of the shelf fixing pin goes through the 16mm diameter hole I drilled through the plasterboard sample?
So take the 16mm diameter flat drill bit and cut through the plasterboard, up to the masonry, like so:

Then slot the Rawl plugs into the masonry holes. You may need to use something to poke it in a bit, I had to use a large drill bit to push it past the plasterboard. I also ended up using a 9mm masonry drill bit to cut the hole for the Rawl plug, 1mm over the instructed 8mm.

Next up, you’re good to screw on the concealed shelf fixing pin/bracket.

You may struggle to screw them on all the way by hand, so you’ll need monkey grips to get them on the last few turns and make sure they’re tight onto the wall. If they’re wonky i.e. not perpendicular to the wall, don’t worry, they can easily be bent in the right direction.
To bend the shelf support pins in the right direction, once they’re inserted and tightened onto the wall, place your set square against them and the wall. If the pin is not aligning with the set square, bend it until it does, it should stay put.
I would suggest you take the time to bend them straight now, because this’ll make it easier when measuring the exact distance between the pins.
Drilling the holes in the back of the shelves
So, now we have the shelf support pins firmly in the wall, we need to measure the distance between them. We’ll use this distance to accurately mark out the hole positions on the back of the shelf planks.

You’ll also need to measure the distance up from the bottom of the shelf plank, it may not have ended up half way up the board as intended.
Once you’ve got these measurements, you can accurately mark out the positions of the shelf fixing pins onto the back edge of the shelf plank.

When drilling accurate holes into wood, and the hole diameter needs to be quite large, in this case 13mm. It’s not a good idea to start off with a 13mm drill bit. It’ll just churn the wood up and will not be very accurate. Instead, start off small and work your way up to the desired diameter. In my case, I used the following drill bit sizes, in the following order:
- 2.5mm
- 4mm
- 6mm
- 8mm
- 10mm
- 13mm
Once you’ve got the two holes drilled out, you’re good to place it onto the pins on the wall.
Attaching the shelf plank to the wall
Attaching the shelf plank to the pins is no easy task, especially if it’s chunky hardwood like mine. I found the easiest way was to line up the holes over the pins, then give it a good shove. You’ll need your mallet to hand here, give it some taps to get it on further, not too hard as to make a depression in the wood.
Then, when it’s okay to let go, grab the chock of spare wood and rest it against the edge of the shelf plank. Using a 3 lb lump hammer, hit the spare wood so that it drives the shelf plank further onto the pins, like so:

When the shelf is mostly on the pins, you’re probably okay to leave it (although I cannot guarantee this, of course!). The first plank will likely be sagging a little, because it’s hard to get it all the way on, mine was like this:
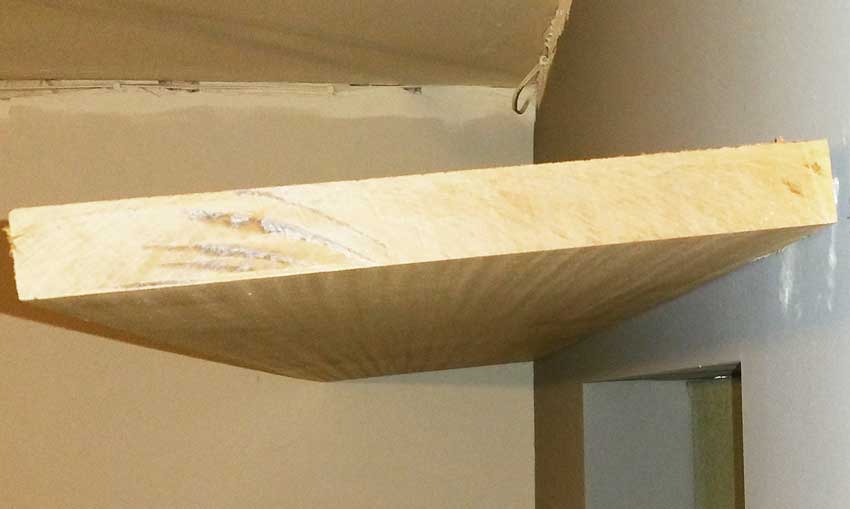
Not to worry, that’ll get propped up when you drive the vertical bit in. This is what you want to do next, so repeat the process as for the first plank, and add the vertical piece underneath that first plank. Hammer it in place, including giving the first plank some whacks at the same time, until they’re both snug against the wall.

Then clamp them both together, if you have a clamp big enough that is. You may be able to do this without the clamp though. You can make out the clamp in the picture above, it’s behind my hand.
Get the step ladder out and take a pack of 5.0 x 90mm screws, the drill with a cross head bit on it (found in the screw box), a 3.5mm drill bit, a set square, pencil and tape measure, a deburrer, and head to the top shelf.

If you’re shelves are 300mm wide, you’ll want to screw through it with three screws - front, middle and back. Mark out the holes for these positions, so that the screws pass through the top horizontal shelf and into the centre of the vertical shelf below.
Drill through these holes as vertically as possible using a 3.5mm drill bit.
Helpful Tip
By using a large drill bit (10mm or more), create a conical countersink in the top of the hole so that the screw head will be buried. You’ll want to fill over the screw head later on so make sure the screw head surface is well sunk into the wood.

Then, whilst either clamping or holding the two pieces firmly together, screw through them with the 5.0 x 90mm screw, attaching them together. If you keep screwing when they meet, it’ll clamp them together tightly. Do this for all three screws.
Now you’ll have the first two pieces joined together, it’s time to clamp these firmly to the wall.
We’ll do this using L brackets, which we’ll paint over at a later date to hide them.

You’ll notice that there’s a gap between the shelf plank and the wall, this was the furthest I could get the shelf on with the mallet. We’ll need to clamp them together using the L bracket. First, attach the L bracket to the shelf, making sure the edge of the L bracket lines in with the edge of the shelf plank. There should be a gap between the L bracket and the wall, to match the gap between the shelf plank and the wall. As shown on the picture above.
Once you’ve lined up the L bracket correctly, drill a hole using a 2.5mm diameter drill bit through the shelf plank. Then attach the L bracket to the plank using the 4.0 x 30mm wood screws.
Note: If your planks are not 32mm thick, like mine, adjust the screw length accordingly.
Then, mark the position on the wall, through the L bracket, and proceed to drill using a 7mm masonry drill bit on hammer action. Insert the 7mm Rawl Plug and proceed to tightening the L bracket onto the wall with a 5.0 x 50mm wood screw, effectively clamping the shelf and wall together.
I ended up using 5 L brackets over the length of mine, just to be sure it’ll be okay, may have been a bit overkill but hey ho.
Building the rest of the shelf wall
Okay, so that’s the fundamentals of attaching the shelf planks, both vertical and horizontal, to the wall, repeat this for the remaining planks.
Also, like you drilled three screws through the top shelf, you’ll need to drill them through the underside of the lower shelves, so that they go upwards into the bottom of the vertical shelf plank, like so:
FILLING THE GAPS IN THE SHELF JOINTS
You may find a few gaps between the vertical and horizontal members of your shelf. This is normal and mainly due to the fact each one is individually attached to the wall, making accuracy a bit of an issue.
You’ll also need to fill in the recess on top of the wood screws, completely covering them over and hiding them.
To fill the gaps and recesses, collect up the sawdust you created when cutting all the planks, you may need quite a bit.
Then put this into a standard kitchen sieve, you need to sieve out the larger bits, as these will only get stuck in the gaps and make them more difficult to fill up.
Mix the finer sawdust particles with wood glue until a gloopy consistency is achieved.
For this, I mixed my saw dust with Lecol 7500 filler, but only because I had some left over from doing my parquet floor. It is really good stuff though. You could use standard wood glue

Using a scraper, fill in the screw head holes. Don’t be too fussy, you can sand it off easily once it’s dried.
Then, go onto filling the gaps between the boards. Use a scraper to really push in the filler to the gaps.

SANDING THE SHELF DOWN
Now’s the time to get it looking really good. Start off with the 80 grit sandpaper, sand down all surfaces and round the edges so they’re not sharp.
Step it up to a 120 grit sandpaper, and repeat in all areas.
Give the filler and its surrounding area a good sanding down too, to make sure it blends with the wood as much as possible.
Once sanded down, make sure you give the shelves, and the surrounding walls, a good clean. You’ll need to do this before the next phase.

I found a brush nozzle on a vacuum cleaner did the trick.
FINISHING THE SHELF OFF
There are many choices when it comes to finishing off wood, including:
- Wax
- Lacquer
- Varnish
- Paint
- Oil
And likely some more…
I chose to finish mine with a lacquer called Loba WS 2K Fusion in Matt | Satin, mixed with a Loba Hardener A1. This stuff is suitable for wood flooring, so it’ll easily be up to the task.
I’ll likely try out the other methods in time, and will link to them accordingly as I do so.
The lacquer is mixed with the hardener using a 10:1 mix, 10 parts laquer to 1 part hardener, in accordance with their instructions. I did this using standard kitchen scales. By weight I was able to get the proportions right.

Then, using a standard painters brush, brush on the mix to the surface of the wood. You’ll find that it spreads out fairly easily, and doesn’t leave the brush marks on the surface.
You’ll need to apply two coats of this stuff. Let the first coat dry for at least 6-8 hours, then give it a very light sanding with 120 or more grit sandpaper, remove the dust with a soft brush, and re apply the second coat onto the shelves.
Allow to dry overnight, before using the shelves.
I found two coats was sufficient, but I may add another coat in time, just to be sure.
And finally, stand back and admire your hard work, this is the reason I love DIY. Make yourself a well earned cuppa and send me a photo, I genuinely want to see how you did.
This is the first part on a series of courses for wood working for now, the next part will likely be the how-to on building a bespoke fitted desk, as you probably saw in the pictures.
Thanks for taking the time to read through this page, I appreciate it. If you have a comment or would like to get in touch, fill out the email form below and hit subscribe, I look forward to hearing from you.