
As Christmas was approaching and I had a bit of time off, I thought it best I get round to sorting out the Dining Room.
It needed a complete makeover, there was damp within its external walls, it was cluttered, there were no curtains. At least it's got a nice floor!
This Project is Still Ongoing
I started this project on 31.12.2017, but haven't yet completed it. I'm adding to the blog (below) almost on a daily basis, mostly at weekends as I carry out the work. So be sure to keep checking in from time to time to see how I'm getting on.
What Did I Need to do?
After a bit of planning, I came to realise it wasn't quite as simple as first thought...
The tasks ahead of me were to:
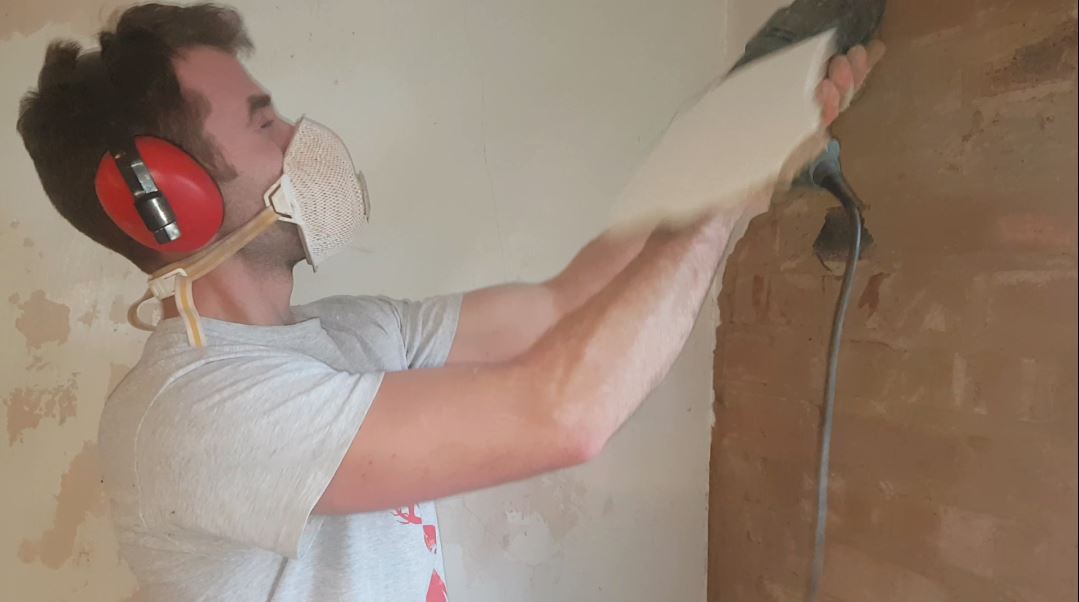
- remove all existing plaster,
- Sockets:
- 7 double sockets,
- 1 phone socket,
- 1 Virgin Media socket,
- a TV aerial socket, and finally
- run four sets of performance speaker cables to all four corners of the room.
- Then it was trunking over a load of cable
- installing a new light switch to control a row of spot lights along a shelf,
- a shelf I had to build from scratch by the way,
- and several more.
- Then fix plasterboard to all the walls,
- skim coat it,
- paint and decorate it,
- install 6 new spot lights. And finally,
- build a bespoke 3.7m long desk made from 30mm thick Meranti timber, with built in Meranti desk drawers.
- Above the desk, will be Meranti shelves spanning the entire wall and up to the ceiling, with the first shelves casting dimmable spotlights downwards onto the desk...
... So as you can imagine, it turned out to take quite a long time...hang on, it's still ongoing!
Estimates
Just for a bit of fun, I have a go at estimating the cost & time
At the start of the project, I estimated that it would cost no more than £1000, and I could get it done within 5 days (this doesn't count the built-in desk, that's furniture). I had the week off work at the beginning of the year, so I was going to use that time to get it done.
I also estimated that it would cost me an extra £1500-£2000 if I paid other tradesmen to carry out the work.
Actuals
Actual figures as work is completed
17th February 2018 - I'm most of the way through the Dining Room now and can confirm the following:
- Total spend so far: £968.99 (not counting the built-in desk, that's furniture)
- Total time on job 17 (including the shelves & desk).
- Estimated savings: £1200
Here's my detailed spending report for the dining room to date.

Daily log
A brief log of my battles with the tasks! with a few pictures chucked in...
Day 1 (31.12.2017)
Starting the day early, I get straight to tearing off the plaster from the walls, managing to remove 90% of it by the time I finished that day. Also found the cause of the damp in my walls - the builder who built the house had taken the plaster right down to the ground floor slab!

Day 2 (01.01.2018)
A bit of a late start, due to it being new years eve last night! Did some light jobs including chiseling out the plug sockets and drilling out the spot lights holes. 4 out of 6 holes I drilled for the spot lights conflicted with floor joists!

Day 3 (02.01.2018)
A lot more dusty work today, starting off with chiseling out some more holes for sockets. I decided I would put high performance speaker wire to the four corners of the room, I quite fancy surround sound. Then it was time to have a mammoth, four hour clean up operation. At about 10pm I was still at it, wiring up for the plug sockets.

Day 4 (03.01.2018)
Early start getting the speaker cables and Ethernet cable in place. Then it was time to fix my first plasterboard, never did that before! As it turns out, it's pretty easy.

After the first board, the rest went down fairly quickly, and by 11:30pm, I'd done 1/3rd of the room.

Day 5 (04.01.2018)
Straight onto fixing more boards today, got another 1/3rd of the room done, including both the window recesses, so pretty pleased! I said I'll have it done by now....

Day 6 (05.01.2018)
For a 3rd day, I got the last of the boards up and finished by 10pm, glad to have done it and pleased with the results. Bit of a tense moment as I removed the radiator, half expecting the entire system to drain out! I managed to design and spec the Meranti wood and got an email off to get a quote, looks like it'll come in at around £950. All in all, a pretty productive day!

Day 7 (06.01.2018)
Well I started the day thinking that I'd just need to sort out a few bits, then would have plenty of time for plastering. Those few bits turned out to take me all day. I filled in the large gaps between the plasterboard, scrim taped the smaller gaps, installed the last 7 plug back boxes, fixed the window beading in place, ordered the radiator, and had a big clean up, so not too unproductive!


Day 8 (13.01.2018)
Finally getting round to plastering and after getting everything prepared and checking up on some how-to videos, I felt I was ready for my first ever attempt. I stuck to plastering just the one wall and allowed it to set so I could be certain I was good enough to carry on with the remaining walls. The plaster goes on in two coats, after the first coat I was worried it was too bumpy but found that it flattened out really well once I'd gone over it a second time with the float.
All in all, I was really pleased with the results and was happy to continue with the rest of the room, I got a second wall plastered that evening.

Day 9 (14.01.2018)
Today was the second day for plastering the room and I was off to an early start. Having taken the lessons learned from the previous day, I was able to get the other two walls and the two window reveals plastered by mid afternoon.
Once I'd had a big clean up, I was able to inspect my work and compared the first wall I'd plastered with the last wall. The difference was noticeable, with the last wall being a much better, smoother finish. This gives me confidence that I'll be able to continue plastering the rest of the house myself, hopefully there won't be any ceilings to do. It's also a shame the last wall is the one I'll be mostly covering with shelves and a desk! Maybe I should've done it in the opposite order!

Day 10,11&12 (04-06.02.2018)
Had a few weeks off the dining room due to fitting a 2nd hand kitchen in my, er, kitchen! Anyway, back onto the blessed Dining room and this Sunday morning I've got the place completely decked out with sheets.

The reason I've got everything covered is because I wanted to paint on the mist coat of pain using my fence spray gun. Turns out, it worked really well. I was able to get three coats of paint on my plaster within a few hours, and the finish is perfect!

I was under pressure too, because the blind man was due to install our blinds on Tuesday 10th. I managed it, and applied the last coat of paint around 3am on that Tuesday, got a few hours kip then off to work!

Day 13 (11.02.2018)
Not a great deal of DIY done this weekend but I did manage to get a few nice sockets on!

Day 14&15 (17&18.02.2018)
Had a great weekend putting up my shelf wall. So, it turned out that the Meranti Hardwood I wanted wasn't in stock, so I opted for Sapele instead, and I'm glad I did!
It's very similar to Meranti, in fact, I can't tell the difference, here's a picture of the first shelves I put up (I started at the with the top ones):

By the end of the weekend, I'd managed to put up the entire shelf wall. this took some doing. There are 17 wall pins and 6 brackets holding the thing up! Here's one of the finished job:

Day 16 (19.02.2018)
Got rained off work for a couple of hours this morning so got cracking with the supports for the desk. Fair to say, I don't think they're going anywhere...

And I spent the evening sanding down the Sapele Shelves and filling in a few gaps. To fill the gaps, I used a mixture of Lecol 7500 Filler with Sapele sawdust, which should be ready to sand down in the morning.

Day 17 (20.02.2018)
Straight onto the DIY as soon as I got home from work, and I decided to tackle the shelves. Sanded down the filler I'd used the previous day, and it's looking pretty good!

I also got cracking with the desk. Which was a bit of a struggle handling 3.6m long lengths of hardwood, but they fitted in perfectly! Nearly there, got to connect the two pieces of 3.6m long wood together next, with a seamless joint! Here's a picture of the wall so far:

Day 18 (24.02.2018)
Just one goal today - joint the two planks of wood to form my desk. This involves quite a bit more than you might think. Firstly, I had to choose the best side of each plank to be the top of the desk. Then, I had to turn them over and router out the recesses for the clamp bolts, these hold the two boards together, like this:

Before clamping them together, I had to straighten the edges out where they would butt up against each other. I did this using my router again and used my long level as a guide.

After a few checks, I chucked a load of glue on both surfaces of the plank edges and pushed them together. As the glue was setting quick, I tightened up all 7 clamp bolts as fast as I could
Day 19&20 (26&27.02.2018)
Next on the Dining Room list comes a more therapeutic DIY task - sanding and varnishing, both of which are fun with a pair of good headphones and the right music. I think I totalled about 10 hours of combined sanding and varnishing in these two evenings, apart from getting a lot of quality thinking time in, the results look amazing:

Getting the right finish on wood can be nerve wracking as you never quite know how well it'll turn out. I used Loba WS 2K Fusion, mixed with the Loba Hardener to lacquer my Sapele wood. I had some left over from coating my parquet floor and thought I may as well use it. Apparently, it's good for commercial foot traffic so I guess it should do the trick for my desk. Anyway, here's a close up:

Day 21 (1.03.2018)
Time to sort the walls out - they'd got a bit scuffed and bumped when installing the shelves and desk. I had also got the lacquer on the walls too, so I had to paint over that to hide the shine. Anyway, I took great care in getting the paint along the join between the desk and wall. It took ages, but I love it!

Day 22 (24.11.2018)
Okay okay, it's been ages since I did any work on this room, summer took me outside and what a summer it was! Now that it's cold again, I'm back inside and working on the (soon to be) one year project that is the Dining Room.
For this day, I put up the coving and did a good chunk of work on the spot lights. How-to on these to follow in due course! First time coving for me, and it went up a treat. I used the lightweight polystyrene stuff with some adhesive.

This took me about 4 hours, so I spent the rest of the day sorting out the spot lights. We'd lived with dangling wires (not live) for months so it was about time I sorted this out.
 Once the plaster has dried, I'll give it a sanding down and a fresh coat of paint

Hellow my name is Martinbrurn. Wery good post! Thx 🙂