Replacing a fence usually involves destroying flower beds, so I've decided to replace mine with a fence that'll last decades, find out more below...
I reckon you'll get a lot of benefit from this page. If you're in a hurry, you can jump straight to...
- Introduction
- Tools for the Job
- Legal Considerations for Replacing a Fence
- Setting Out Fence Posts
- Digging Out the Post Holes
- Which Posts Should be Concreted First?
- Checking the Fence Posts Before Getting Started
- Concreting the Posts
- Installing the Gravel Boards
- Installing the Cant Rails
- Lead Flashing Post Caps
- Fixing the Feather Boards to the Cant Rails.
INTRODUCTION
When it comes to fencing (and I've built all sorts) is that for a relatively small amount of extra money on the materials, it's possible to increase its life dramatically, sometimes by factor of 3-5 times. For me, I'd rather spend more on the fence to avoid having to replace it at all. Especially as fences are typically located next to flower beds, and so replacing them usually ruins the flowers too, or requires some other sort of major uplift.
What sort of fence is this about?
See the picture below? It's about building one of those...

What materials do I need?
Here's the spec:
- The fence is 2m high (the highest before planning permission is required)
- The posts are made from 5x5” (125x125mm) oak that are 1.9m out the ground and 0.7m under ground. The tops of the posts have been cut at an angle to shed water, and have been capped with lead to protect the tops.
- The rails (the horizontal beams that the feather boards are fixed to) are made from 50x75mm oak, with the tops chamfered to shed water.
- The face of the fence is clad using 150x25mm oak feather boards that taper down to about 5mm along one edge.
- The boards are fixed to the rails using stainless steel ring shank nails. Ring shank nails have ribs along the nail to avoid them pulling out, which can sometimes happen as the boards twist over time.
- The feather boards rest on a 22mm thick oak gravel board, running along the bottom of the fence.
- No treatment has been used on the fence due to it being entirely made from Oak. I don't want to have to tread all over my flower bed every few years to keep the fence looking the same. I'm going to let it weather naturally.
- And finally, concrete/postcrete to bed the posts into.
How long did it take?
The fence pictured above is about 4m long, with two new posts (the far end is attached to an existing corner. All in, about 2 short days.
How much did it cost?
Total came to £405.38, here's the cost breakdown in my spending report (opens in a new window).
Do I need Planning Permission?
Not for this fence as it is under 2m in height, you can read more about planning permission for boundary structures here, plus other useful legal stuff.
TOOLS FOR THE JOB
What tools will I need?
Here's the list:
- 1.8m long and a 1.2m long spirit level - You can use two 1.8m (6ft) long ones if you have them.
- Spade - To dig out the holes.
- Trenching spade - This will also help but isn’t necessary, trenching spades aren’t as wide as a normal spade, so are ideal for digging post holes.
- Shovel - Required if you're mixing your own concrete in a mixer.
- Wheelbarrow - To shift the soil about.
- Long Tape Measure - usually on a 30m reel.
- Short Tape Measure - 5m length will do.
- String line – to ensure the fence lines up nicely, both vertically and horizontally.
- Hammer
- Hand Saw
- Lump hammer - To tap the posts down if they're a little high (before surrounding with concrete of course!
- Sharp Knife - To cut open bags of instant post mix or cement.
- Small Trowel - Even a gardeners trowel will do. This is to haunch the top of the concrete against the post.
- Paint Brush - To apply the end grain protector.
- Gloves - To handle the lead flashing
- Tin Snips - to cut the lead flashing
Materials
- Either:
- Postcrete (ready made concrete, just add water), or
- Ballast and cement (ballast is ready mixed sand and gravel)
- 5x5” (125x125mm) x 2.8m long Oak posts.
- 50x75mm oak cant rails - read further for the lengths.
- 150x25mm-15mm oak feather boards, 1.8m long.
- 22x200mm oak gravel board - read further for lengths.
- Water - for the concrete.
- Stainless steel ring shank nails - 4 per feather board (if using 4 cant rails).
- 100mm long stainless steel or galvanised screws - for fixing the cant rails to the posts.
- Lead flashing - for the tops of the posts (you can buy this in 300mm wide strips from a builders merchant).
- Spray Paint - To mark out the post locations before digging.
- Length of Wood - Used as a spacer between the fence posts, so it needs to be at least that distance (mine was 1.875m).
- Offcuts of Wood - To use as a spacer between the posts and gravel boards, usually the same thickness as the cant rails (mine were 50mm).
- End Grain Protector - I use Ronseal, about £12-£15 per tin.
- Clout Nails - for fixing the lead flashing to the posts
Helpful Tip
It’s far cheaper to buy 5x10” (125 x 250mm) Oak sleepers and, if you have a good circular hand saw, cut them in half along their length to form two 5x5” posts.
LEGAL CONSIDERATIONS FOR REPLACING A FENCE
If you need to take down an existing fence, there are a few important things to do beforehand that will avoid some pretty nasty pitfalls at a later date. These are both legal considerations and to ensure you don't end up in a dispute with your neighbour. Have a quick read of my separate post to learn more (opens in a new tab), or jump direct to the relevant sections below:
SETTING OUT FENCE POSTS
Setting out for fence posts can be divided into two parts:
- The distance between the posts
- The distance from the post to the boundary line (offset)
Distance between the Posts
Posts are usually set out about every 1.93m, or thereabouts. This is because standard fence panels tend to be 1.83m long, and posts tend to be 100mm square. Of course, you can use 75mm square posts (not recommended), or use shorter panels.
With my fence, I used 125mm square posts, purely for longevity. I wasn’t using panels, so no restrictions there on the gap between the posts. Instead, I used cant rails (the horizontal rails to which the feather boards are attached to) and attached individual vertical boards to these. Here’s a picture:

You can see how the cant rails are screw fixed to the posts, then the vertical boards are attached to these rails using stainless steel ring shank nails.
As the cant rails can be any length I wish, this leaves the gap between the posts totally up to me. As I was using Oak cant rails of a good section size, plus four of them (usually it’s only three), I could’ve comfortably increased the distance between the posts to 2.5m, probably. Anything more than this and there would’ve been a danger that the rails would eventually sag, given enough time.
Here’s an interesting one - I was on a new build estate not so long ago and had a look at a similar fence built from softwood. The distance between the posts was a staggering 3.6m, and there were only three cant rails. The section sizes of the rails were similar, but they were sagging down by about 100mm. The fence was only a year or two old. Somehow this had been passed off by NHBC, why am I not surprised!
Anyway, rant over, so I stuck to keeping the distance between my posts to 1.875m. Here’s a useful diagram to show you:

The other consideration is if you’re fencing between two static structures, such as between your house and the fence at the end of your garden. It would look best to keep the distance between the posts the same, here’s how to easily work this out:
Take the overall distance between the centre of the first and last post, let’s say 7.5m. Think about your ideal distance between the posts, say 1.9m (it could be different for you). Then divide the total distance by the ideal distance - 7.5/1.9 = 3.95. This number represents the number of gaps between the posts.
Clearly, we can’t have 3.95 gaps, it has to be a whole number, so round it up to 4, then do the sum 7.5/4 = 1.875. This is the distance between each post to get 4 gaps, so 1.875m it is!
Here’s a sketch to show just this:

You may want to stagger the new posts beside the old posts, leaving the stumps of the old fence behind. This has the added benefit of leaving a trace from the old boundary, should a dispute arise. I talk about this in more detail here.
Obviously, if you’re starting off from an existing fence, or a structure such as your house, then that’s your starting point.
From that starting point, take your long tape measure and drag it out along the fence line as far as you need to. The reason it’s important to use a long tape measure is for accuracy. If you use a short tape, and measure out the centre of posts one at a time, such as measure and mark followed by moving the tape to the next mark then repeating along the entire length, by the time you’ve reached the end of the fence line your post mark could be out by 10’s or 100’s of millimeters. If you use a long tape, leave it on the ground and mark at points along that tape, without having to move it, then accuracy will be maintained.
For example, my posts are 1.875m apart, I only put two posts in but for the purposes of this example let's say I’m putting 6 in. I’ll drag out the long tape and mark the ground at the following points: 0m, 1.875m, 3.75m, 5.625m, 7.5m and 9.375m. If I had used a small tape and moved it each time I marked the net hole, it may end up something like this: 0m, 1.875m, 3.78m, 5.65m, 7.57m, 9.475m. You get the point - the accuracy diminishes in relation to the length of the fence.
When marking out the posts, make a large cross, much larger than the hole diameter. You’ll find that the ground around the mark gets disturbed when you come to digging, so having the extra large cross means you will always have marks to double check the hole is in the right place.
Offset from Boundary to Post
Depending on the type of fence, posts can sometimes be offset from the boundary, as is the case with my type of fence.
Here's a top down view on my fence:

As you can see from the picture above, the fence I made has its posts on one side of the boundary. This is because I’m putting the posts on my side of the boundary, effectively giving my neighbour the nice side of the fence. The nice side being the side that the feather boards face. On my side, I’ll see the posts and the cant rails.
There is no legal requirement as to whom the nice side faces, be it your garden or your neighbours, only that the fence doesn’t infringe on the neighbour property. Traditional etiquette dictates that people tend to put the nice side facing their neighbour, but this doesn’t always happen.
You'll also notice that the boundary line is taken to be the face of the feather boards, so that none of the fence overlaps onto the neighbours land. Even with panel fencing, whereby the posts are in-line with the centre of the panels, the face of the posts (the posts stick out more than the panels) should be aligned with the boundary line and not go onto the neighbours land. However, it is usually incorrectly assumed that this type of fence is centered on the boundary line.
Anyway, the centre of my fence posts had to be offset from the boundary line by 135mm.
DIGGING OUT THE POST HOLES
So we’ve set out the fence posts, now it’s time to start digging.
In my example I’m using 125x125mm fence posts that are 1.9m out of the ground. I have bedded them 700mm in the ground and the size of the hole, and therefore the size of the post foundation to fill said hole, is approximately 300mm in diameter.
That’s quite a big hole I hear you say. Well, as described way above, I’m going for longevity. Plus, the fence height is a little higher than the standard 1.8m (6ft) height. This places more burden on the foundations because the more fence there is, the more wind will act on it and want to push it over.
The other reason the diameter is so large is because of the size of the posts (125x125mm). The larger the post is, the larger the hole needs to be so that there is sufficient concrete wrapping around the post, here’s a top down view of the post and its foundation:

I will reiterate that I only plan on building these fences once, because I like my flower beds and I don’t want to have to redo this whole process again, ever if I can help it.
Generally, standard fence posts are 100x100mm, serving a fence 1.8m high. The foundations for these tend to be 600mm in the ground with a hole diameter around 200mm.
You'll also need to dig out an extra couple of inches. This is to allow for a layer of compacted gravel to sit beneath the fence post. I'll go into more detail on this later on but worth keeping in mind when it comes to digging the holes.
To dig the hole, you’ll need a spade. You might struggle to get the spade at deeper depths so I tend to use a trenching spade. Trenching spades are narrower than normal spades and are great for tighter spaces.

Ground Conditions
Ground conditions vary a lot in the UK. Our soil is incredibly diverse, from rocky ground in Scotland to sandy soils in Norfolk to heavy clay where I am, in the shire 😉 (that’s middle England by the way).
At post hole depths, all I encounter is topsoil to about 200mm down and clay from thereon. Nothing a spade can’t get through. Rock is a different matter, you’ll need a breaker of some sort to get through that. You can hire an electric one for about £20 a day, it’s well worth it. Other methods would be to use a bar, which is about a 1.2m long heavy steel bar with a point on one end and wide flat chisel like shape on the other. About 25mm in diameter, these are heavy and give you the momentum to chip away rock. A breaker is much easier though.

If you live on a new build estate, I can almost guarantee they’ll be builders rubble at shallow depth. Bricks, blocks, crisp packets, cans, old plaster, wood, lead flashing, it’s all there and should’ve ended up being removed from site, but that never happens. Be weary, there’s usually sharp items too, such as glass or old blades etc. Gloves are a must.
Anyway, get digging. No real advice here on how to dig, just give it some but watch the wrists.

Helpful Tip
If you have a lot of holes to dig and are getting the waste soil taken away, allow an extra 50% on the volume to account for the soil "fluffing up" during the excavating process.
WHICH POSTS SHOULD BE CONCRETED FIRST
Where to Start?
Now that the holes are dug, it’s finally time to start building the fence. First things first, where do we start?
To make sure the new fence line is straight, and the tops of each post line up, we could do with a string line drawn tight along the length of the fence. Therefore, start with setting in the posts at either end. Once the concrete has set for these, we can stretch out a line between the two and set in the posts between them.

If your fence line is particularly long though, the string line might sag in the middle. This will obviously affect the level of each post when you come to bed them in, and I’m pretty sure you want the posts to be at a uniform gradient.
I tend to go no further than around 20m with the type of line I use. So put intermediate posts in if the distance is long, like this:

Also check whether the ground is at a uniform gradient along the fence line too. If it isn’t, you’ll need a post as close to the gradient change as possible.

So now you know which posts need to be set in place first, one at either end and maybe some intermediate ones.
CHECKING THE FENCE POSTS BEFORE GETTING STARTED
There are a few things to do before installing the posts into concrete, and it's best to get it right now:
- Make sure the posts are the right length, sometimes sawmills provide pieces with excess length. It's not always necessary to cut them down to size, you could dig a slightly deeper hole to accommodate the extra length of fence post.
- If you are sloping the tops, like I have done, do this now. It's far easier than using a hand saw at 2m above ground level, plus you can use a chop saw if done beforehand.

- Check the straightness of the posts, reject warped lengths.
- Check for rot and general signs of poor storage. Sometimes pressure treated timber comes with speckled, light green mould on the surface. This is fine and is just the salts left by the treatment process.
CONCRETING THE POSTS
Now that the hole's dug and you know which posts to put in first, it’s time to set the end posts in concrete, possibly an intermediate one or two depending on your circumstances.

If you’re using ready made post mix, otherwise known as insta-post or postmix, the mix dries out pretty quick and as such the post doesn’t require much in the way of temporary propping.
I’ve found that using ready made mix is far easier and quicker, and only a little dearer than site mixed ballast (ready mixed sand and ballast) and cement.
If you do have a mixer and would prefer to mix your own. Go for a ratio of 12 heaped shovels of ballast to ½ bag cement. Make it a fairly dry mix to achieve the same results as post mix, so that it will set quickly and it’s stiffness will help keep the post in place until the concrete sets.
First things first though, get the post in the hole and check its level. The post doesn’t want to sit directly on the soil, this will cause the bottom of it to be constantly wet. Damp will rise up through the post and reduce its life. Instead, put about two inches of gravel in the base of the hole and tamp it with the end of the post until it’s compacted.

Then place the post on the gravel and check it’s at the right height. If it’s a little high, say 10mm, you can probably hit it down using a lump hammer. If you need to raise it, just take the post out and top up the gravel.
At the same time as this, you’ll need to make sure the post is:
- In the right position, and
- In the right orientation i.e. it’s flat face is aiming down the line that the fence is going to be built.
It can be a bit tricky to get these three things right (level, position and orientation), so it is a little bit of trial and error. You'll also need to check these things whilst also checking that it's upright, you can do this using a medium (1.2m long) or long (1.8m long) spirit level.
Once you've got the post in position, prop it up with whatever you have to hand. I find that resting bricks between the edge of the hole and the post works well. Lean the bricks at an angle sloping away from the post.

Once the fence post is securely propped in place, double check it's position, orientation, height and level.
You can concrete a fence post in two ways:
- Using instant post mix (the easy way), or
- Using concrete you mix yourself (the cheaper way)
Even though I own a concrete mixer, I still go for using instant post mix. It's only a bit dearer than mixing manually and it's so much easier. I'll cover both option for you though.
First off, let's have a think about quantities here. My hole is 300mm in diameter and 700mm deep, pretty big. However, it does have a pretty big post in it (125mm sq.). That said, I still used about four 20kg bags of instant post mix per hole.
For a standard hole with normal sized posts, you want to use no less than three bags of instant post mix.
If you're mixing your own concrete. Use a ratio of 12 heaped shovels of ballast to 1/2 bag of cement, as mentioned above. This quantity will be at the limit of what you should put in your mixer, don't be tempted to overload it. One of these mixes is about the same as 3 bags of instant post mix. Remember to keep this mix fairly dry/stiff.
If you have mixed your own, you're good to chuck it straight in the hole. Take your time at first, don't offload large dollops into the hole, as this will nudge out the post. Believe me, the last thing you want to have to do is readjust the post after you've put concrete in the hole! Carefully place small lumps in the base, filling the bottom of the hole around the entire post. Build it up in layers of about 100mm (4 inches), then tamp it in place using an old length of wood, or whatever you have to hand, this will help squeeze it into the corners.
Continue until you're about 100mm from the surface.

With the instant post mix, you'll need to fill 1/3rd of the hole with water first, then pour in the mix straight from the bag. You'll also need to be careful not to nudge out the post, so pour it in gradually and around the entire post. Once you've emptied a bag, tamp it well using a length of wood, making sure the standing water reaches all the dry powder. Continue until you're about 100mm from the surface, topping up with water as you go.

Helpful Tip
When you've put in all the concrete and the water has drained away, get a small trowel and squeeze the top of the concrete up against the post to create a haunch. This ensures that any water is directed away from the post and reduces the chance of rot.

Installing the remaining posts
Now that the first, last and any intermediate posts are in, leave the concrete enough time to set. The string line will be attached to these posts and pulled really tight, so there needs to be some strength in the concrete to resist this.
For ready made post concrete, about ½ day is usually long enough, but be sure to check the packaging. For site mixed concrete, give it a day.
Attach the string lines about 300mm up from ground level. It is far easier to line up the next set of posts with the string line at this level compared to say, if it were along the top of the posts.
This also gives the line enough clearance from obstructions at ground level, such as plants etc.
Make sure the line is pulled really tight, the tighter it is, the less sag there will be.
When it comes to string line, don't use normal string, or a rope. I highly recommend using a proper line because it's lightweight and strong. I use the type given below, it's light weight means it doesn't sag down and its strength allows you to pull it really tight.
Next up, cut a length of wood to use as a spacer between the posts. For my fence this was 1.875m. You should rest this on the ground and butt it up against the previous post. When you come to install the new post, simply butt it up against the spacer. This is really useful because it ensures the new post is easily kept the right distance from the last post.
The new post should also run alongside the string line, which will make sure it is the right distance from the boundary and in the right orientation.
Now all you have to worry about is checking the height of the post and keeping it vertical using a spirit level.
To get the level of the post right, make a pencil mark on the post that should line up with the string line, so 300mm above ground level. Or, I'm my case, 1.6m down from the top of the post. Now all you have to do is visually check the pencil mark lines up with the string line when you lower the post in the hole.
For each post, do as you did with the first posts, get them concreted in place one by one until all the posts are in.
The next step involves a bit of heavy work on the posts, so best to leave for at least a day to make sure the concrete is really well set.
INSTALLING THE GRAVEL BOARDS
When it comes to feather boarded fencing, it's generally best to work from the bottom up. This is because the feather boards can use the gravel board as a guide by resting on top of it.

A gravel board is installed for a reason. The lower part of a fence is constant contact with the ground, grass and plants. It also gets splashed when it rains. Therefore, it is the wettest part of the fence. This is why houses have a damp proof course about 150mm up from the external ground level, because the rain doesn't generally splash back above 150mm when landing on the ground. Therefore, the gravel board will likely be replaced before the rest of the fence.
For my fence, I used a 200mm high gravel board, to give a little bit extra protection to the feather boards. It is made from Oak and is 22mm thick, which should last a while!
It's important to position the board at a sufficient distance from the post so that the feather boards will rest on top of it. A spacer is used to achieve this.

Notice how the thickness of the spacer matches that of the cant rails, placing the gravel board directly below the feather boards. Doing this ensures a continuous fence barrier but also makes it easier to install the feather edge boards, because they need only rest on the gravel board when being installed.
In time, the boards will shrink as they lose moisture and it'll look something like this:

Going back to the spacer, It can be attached to the posts using screws, like so:

And the gravel board should be screwed onto the spacer too. Before attaching the spacers though, be sure to make a mark on the post at the right height to avoid any mistakes. For me, this was 1.7m down from the top of the posts (remember my posts go to 1.9m above ground level).

INSTALLING THE CANT RAILS
The importance of the cant rails, and the way they are fixed to the posts, is often overlooked. The cant rail not only holds up the feather boards, but keeps the whole structure tied together.
As with the gravel board, make pencil marks on the posts at the right height for the cant rails. I used four rails on mine, and I placed the top one 100mm down from the top of the posts, the bottom one 100mm up from the top of the gravel board, and the two middle ones were equally spaced between.

The length of the cant rails should be enough to connect at least three posts, and each level should be staggered. In the diagram below, I've highlighted the ends of the cant rails with red circles to make this clear:

Staggering the joint positions greatly improves the strength of the fence, it's the same reason brick walls are built by staggering the joints.
Attach the rails to the posts using screws, not nails. Nails could split the wood and in time they tend to come loose, especially as they’ll be a sideways wind acting on the fence.
A minimum of two screws per post will be sufficient, staggered and not in-line with each other, this avoids splitting along the grain.

Use two screws even if the rail is continuous past the post, just space the screws out a bit more.
As the can't rails are holding up the feather boards, they could be subject to quite a bit of force in high wind, especially if your fence is exposed. Therefore, selecting the right type of screw is important.
I used 95mm long, 6.7 plated corrosion resistant external screws, pretty chunky stuff! They also have very large diameter heads, which will help to ensure the wood doesn't prize off the screw.

The head is also pretty flat, so they won't get in the way of the feather boards.
You'll notice that the rail is at a slope along the top. This is to shed water from the top of the rails. They are positioned so that water is directed away from the rear of the feather boards, opposite to the way round that I've installed mine.

At this point I should hold my hands up and say I installed mine the wrong way round, this was intentional. Running along the fence, on my side, I installed a very nice hardwood deck (finished it after the fence job). What I wanted to avoid, as much as possible, was the oak resin dripping onto the deck. Oak has tannins in it and over the first few years, this gets washed out. It stains most things, so I have orientated the cant rails so that the water is directed onto the back of the feather boards.
Anyway, get the cant rail into position using some clamps, then simply screw them in place.
LEAD FLASHING POST CAPS
Sometimes post tops are left simply sawn off flat. Sometimes they have a decorative post cap on the top. I opted for lead. I quite like the industrial look, it suits the chunky and robust nature of the fence. Lead is cheap, waterproof, easy to mould into shape and will outlast the wood, hence why roof flashings are made from the stuff.
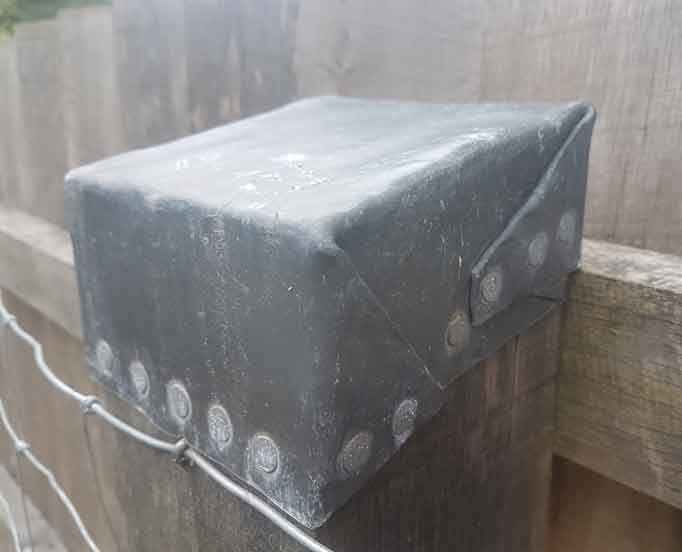
We've already cut the tops at an angle, I mentioned that way up this page. If you decide to leave it at that, I suggest brushing on some "end grain protector", it's a transparent treatment that, well, protects the end grain!

Anyway, back to the lead flashing. I was able to purchase 300mm wide strips of lead, so I cut these into 300mm squares. These fitted nicely onto my 125x125mm posts, with a good amount of overlap to come down the sides of the post a bit. Tin snips are good for cutting lead.
Helpful Tip
When handling lead, always wear heavy duty gloves. Lead is poisonous and the sharp edges can cut easily.
Lead is great to work with. It's malleable and can be moulded easily into shape using your hands or a hammer/mallet.
Place it on the top of the post first, then bend the overhanging bits down so that they sit against the side of the post. Try to position the lead square so that it's central on the post, that way the edges will line up once they've been bent down.
Hammer the corners so that there are no baggy bits and it's tight against the post.
Once in position, nail a load of clout nails around the bottom perimeter and you're done. This is why I suggest fixing the lead flashing in place before doing the feather boards, because you'll need a clear space all the way round the post to do so.
The HSE has some good advice when working with lead.
FIXING THE FEATHER BOARDS TO THE CANT RAILS
This is the fun bit, because it doesn't take long to see good results and if done properly, it looks really neat.
The feather boards will sit on the gravel boards, literally resting on, that's their height sorted out. Remember this picture:
As for spacing them along the fence, mine overlap by an inch either side, with four inches showing, so they are six inches (150mm) wide in total. Here's a top down view of them overlapping:

Your feather boards may be a different size. Either way, allow an inch (25mm) for overlapping them.

Start off by fixing the first board to the rails at one end. Bear in mind that the thick edge of the board will need to be at the end of the fence, the thin edge will overlap under the next board. This is because the nail should be driven through the thick edge first, then through the thin edge, before finally embedding into the cant rail, like so:

Using a medium or long level, make sure the board is vertical, then nail it to the rails.

When it comes to nailing feather boards, you can use normal galvanised nails if both the feather boards AND the cant rails are softwood, 50mm long will be okay. However, I went for stainless steel nails because at least one element (feather boards and cant rails) were oak. Oak contains tannins, which would corrode anything but stainless steel. The nails I used were a type called ring shank nails, which means there are ribs around it's bore. These ribs help the nail to grip when in place, it's very difficult to remove one!

The stainless steel will protect it against rust too, galvanised ones will rust at some point and you'll get lovely brown streaks down your nice new fence.
When fixing the first board to the cant rails, don't hit the nails in all the way. Make sure you leave the nail heads proud of the wood by about 5mm. This will allow you to wind some string line around the nails to use as a guide for the remaining boards. This string line should be pulled tight along the middle of the cant rail to the other end and attached to a screw or nail. This acts as a guide for the rest of the nails as you work your way along. Not only will this make sure the nails are driven into the centre of the cant rails, it also keeps things looking neat.

Make sure to pull the line tight, especially if the string line is spanning larger distances, otherwise the string will sag in the middle and your nails won’t be straight and worse, will miss the cant rail altogether.
Helpful Tip
Don't use ring shank nails to secure the string line at the finishing end, because you'll need to remove them when putting in the last feather board and ring shank nails do not come out easily! Normal smooth shank nails or screws will do.
Once this is set up, you're good to start fixing the feather boards to the rails.
Double check again that the first board is vertical, then place the next board behind the string lines and against the first board. When you do this, you’ll also need a tape measure to check the boards have the right overlap (25mm). I find a spacer is easier, especially if you have lots of boards to fix in place, this saves on having to pull out the tape measure every time. A spacer can be an off cut of wood that's been cut at the right length, doesn't need to be fancy.
Once in the correct position, nail the 2nd board to the first, no need to pre-drill here if you’re using the same nails as me, they’re thin enough. Thicker nails would require pre-drilling.
Repeat this process for the remaining boards. Don’t forget to regularly check the boards are vertical, do this for every 5th board and you’ll be alright.
Once you've finished with the string line, remove it and knock the first nails in fully.
Sit back and admire your work.

Thanks for taking the time to read through this page, I appreciate it. If you have a comment or would like to get in touch, fill out the email form below and hit subscribe, I look forward to hearing from you.
Hi, I’ve been looking to replace some old fencing with oak feather edge fencing just like how you’ve detailed in your report. Really helpful instructions thanks. Can you tell me where you obtained the oak fencing, boards, cant rails etc. as I’m struggling to find places that sell them? Thanks
Hi Nick, thanks for your question and glad you found the how-to helpful. I got the oak fence boards and cant rails from a sawmill near me – Belvoir Sawmill, Belvoir Rd, Knipton, Grantham. They have a website but I’m not sure if they deliver far (I don’t know where you live). Otherwise, let me know what county you’re in and I’ll have a look online for you.
That’s a kind offer but I think you’ve got enough going on with the extension etc. I’ll call some local timber yards near to me in Sutton Coldfield. Thanks again.
No problem at all and yes, I am a little busy at the moment. I’ve just checked with my local sawmill and they wouldn’t deliver that far. However, a quick Google search for sawmills in your area brings up a few results (Great Barr Sawmills, Davies Timber etc) so it’ll just be a case of giving them a call and see what they can offer. With Birmingham so close, you shouldn’t have a problem finding one. Good luck with it and let me know how you get on.
Found a really helpful sawmill near me but they’ve advised to wait till after the summer before putting up the featheredge fencing, especially oak as its prone to warp and crack if it dries too quickly. Guess I’ll heed their advice and wait a couple of months.
An excellent and clear description of the steps to building a fence. This is my first attempt and your guide has been very informative. Thank you for taking the time to put this together. Lots of novices, like me, will find it extremely useful.
Thanks Niki, I’m glad you found it useful and hopefully it’ll serve you well when building your fence. If you think of any way to improve the how-to, or make it clearer to understand, please let me know